
Three Durbanville Homes, Three Different Routes of Water Entry
Peeling or bubbling paint tells us that a coating has failed, but the damaged paint alone does not identify the cause.
Before repainting, the more useful questions are where moisture may be entering, which surrounding surfaces or building details have failed, what preparation is required and whether any underlying condition will remain outside the painting scope.
This guide uses three painting projects we completed in Vygeboom, Durbanville Hills and Aurora during 2026. Each project presented a different visible paint problem and a different water-entry route.
- Vygeboom: peeling paint on an interior windowsill associated with failed exterior window sealing.
- Durbanville Hills: extensive boundary-wall coating failure with cracks across the exposed coping.
- Aurora: peeling bedroom-wall paint associated with failed flashing at an exterior canopy-to-wall junction.
The examples demonstrate why the same preparation system should not automatically be prescribed for every peeling or bubbling wall.
For our complete local painting service, documented Durbanville projects and quotation information, visit Painters Durbanville.
About the Moisture Readings in These Examples
Our inspections included readings taken with a Protimeter DigitalMini BLD5775N.
On plaster and masonry, these readings are recorded as wood moisture equivalent (%WME). They help us compare the condition of different inspected points but should not be interpreted as the literal percentage of water contained in a masonry wall.
A moisture reading also does not, by itself, prove rising damp or identify where water is entering.
We consider readings together with the position of the damage, cracks, windows, seals, roof junctions, copings, exterior surfaces and other visible building details before recommending preparation.
Vygeboom: Peeling Paint on an Interior Windowsill
Location: Vygeboom, Durbanville
Completed: 6 March 2026
Project: Interior painting with exterior window-seal repairs
What We Found
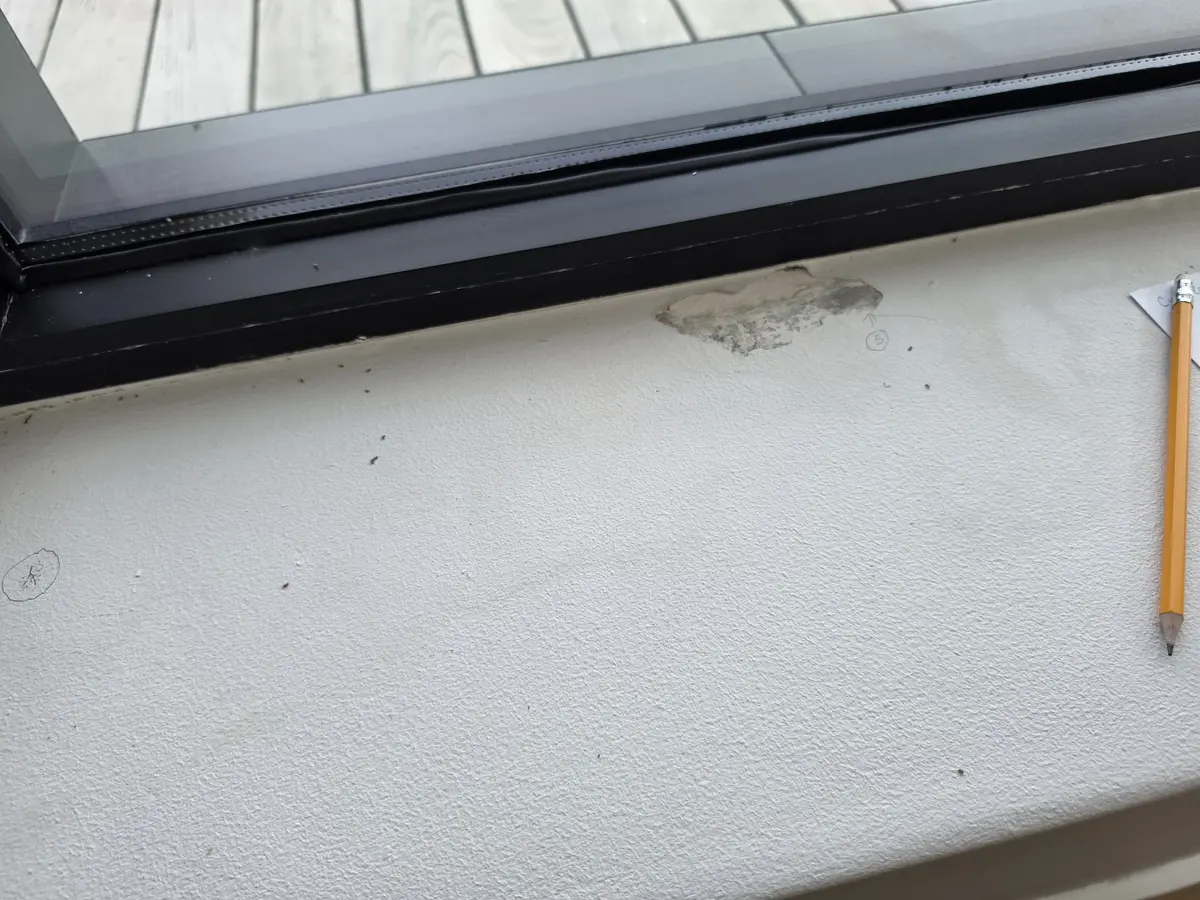
During this interior painting project, peeling paint was identified on the inside of a north-facing window.
The failed coating had exposed the cementitious substrate and left an uneven depression that needed to be repaired before a uniform decorative finish could be achieved.
Protimeter readings recorded during our inspection were:
- 19.7% WME on the windowsill
- 12.1% WME on the wall below
The higher sill reading helped us understand the distribution of moisture in the affected area, but the readings alone did not identify the water-entry route.
The Exterior Defect Behind the Interior Damage
Inspection of the exterior side identified failed sealing around the window frame.
The existing exterior silicone had weathered and deteriorated, creating a water-entry route around the window junction.
Simply repairing and repainting the damaged interior sill would therefore have left the identified exterior defect untreated.
Exterior Resealing
The deteriorated exterior sealant was removed and replaced with a suitable single-pack polyurethane sealant.
The repaired exterior reveal and sealed junction were then prepared and finished according to the project specification.
This demonstrates why peeling paint below or beside a window should prompt inspection of the exterior frame junction, sill and surrounding waterproofing rather than only the damaged interior surface.
Repairing the Interior Windowsill
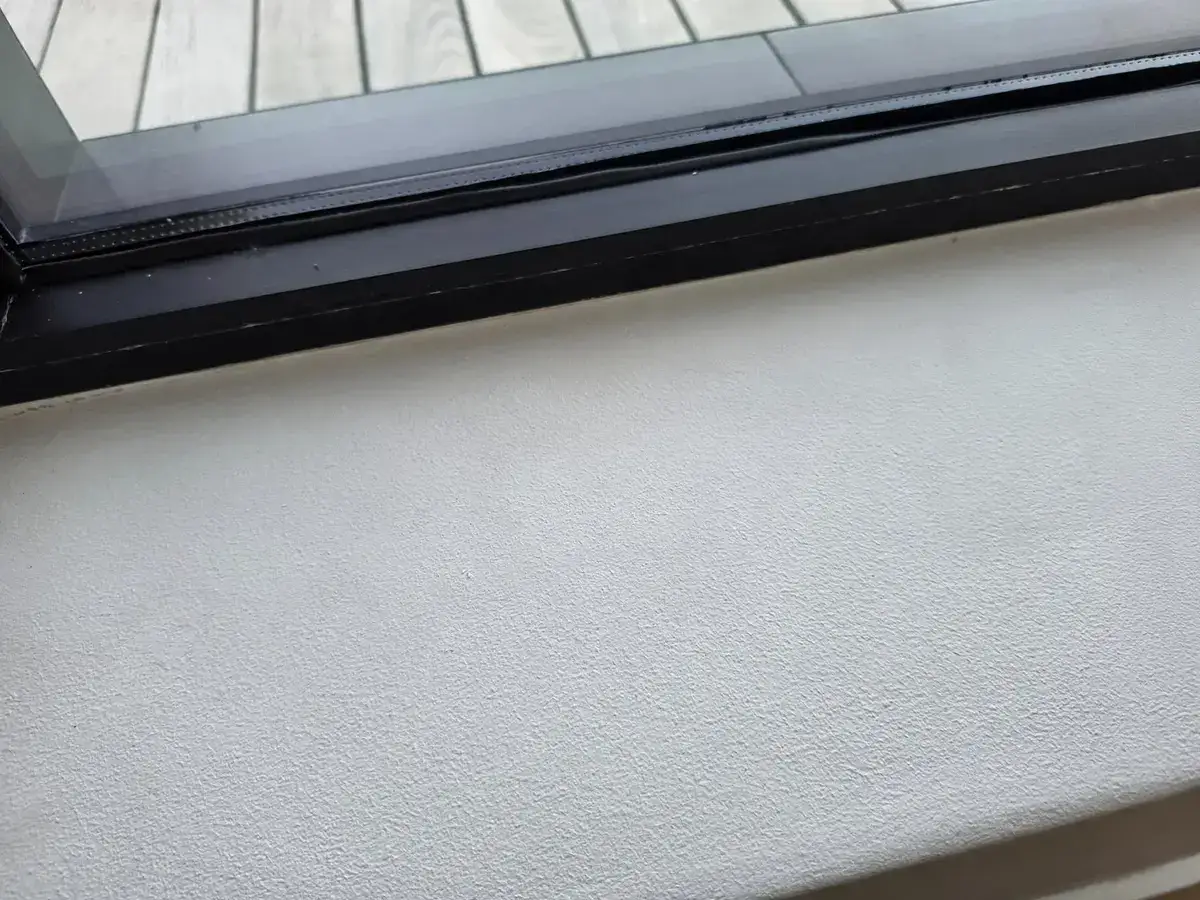
Loose paint was removed from the affected interior area and the depression was repaired using masonry patching material before sanding to a smooth finish.
Dulux recommended Dampshield for the horizontal sill and wall below for the particular conditions found at this property.
This recommendation was specific to the Vygeboom project. It should not be interpreted as a universal specification for every windowsill or every damp-related coating problem.
Two coats of Dulux Dampshield were applied according to the project specification before the finishing coats were completed in the client’s existing interior colour.
What the Vygeboom Example Shows
A relatively small area of peeling interior paint can originate from a defect on the outside of the building.
The successful preparation therefore involved more than scraping and filling the visible patch. The exterior water-entry route first needed to be addressed before the interior coating system was restored.
Our Graanendal Estate damp-repair case study provides another Durbanville example where interior coating failure was investigated together with exterior defects.
Durbanville Hills: Peeling Boundary-Wall Paint and Cracked Coping
Location: Durbanville Hills
Completed: 7 August 2026
Project: Exterior painting including boundary-wall repairs
What We Found on the Wall and Coping
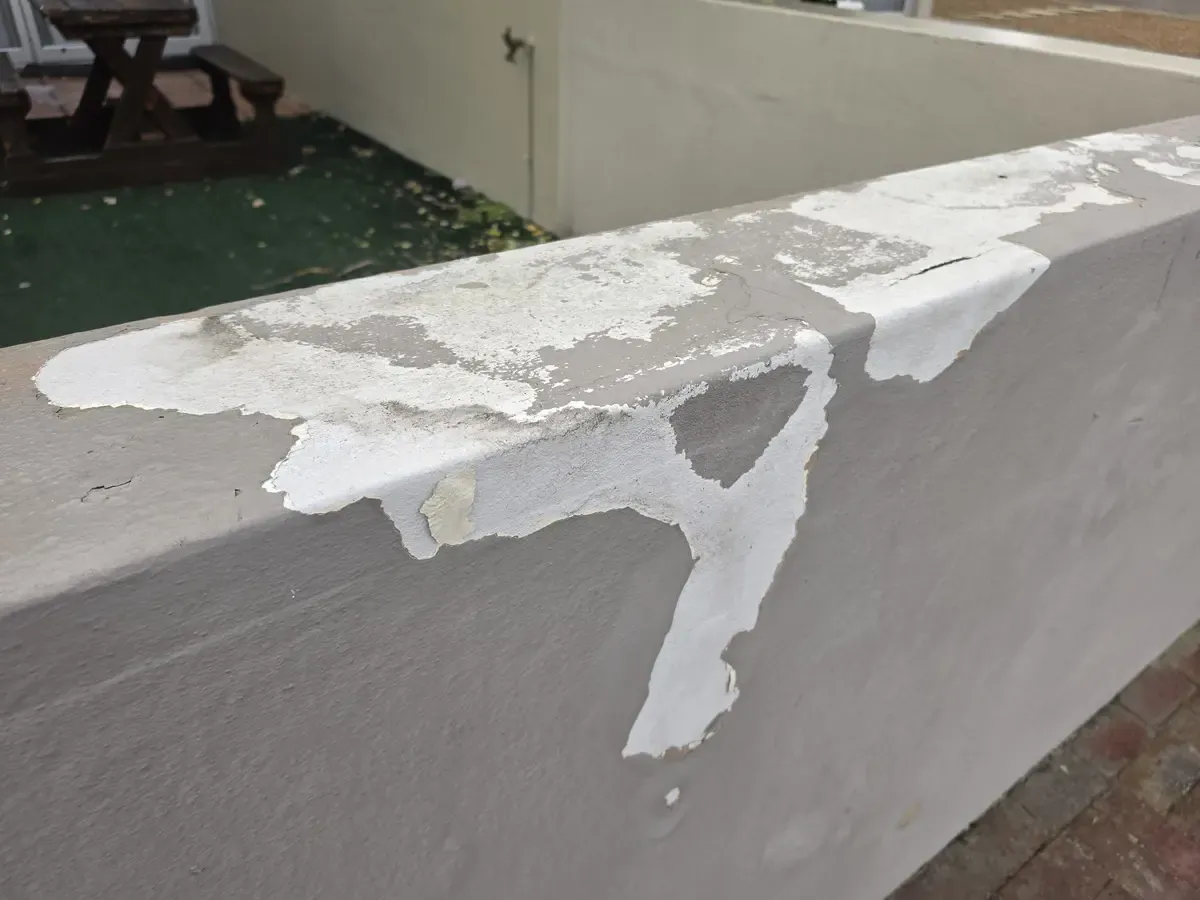
The Durbanville Hills boundary wall showed extensive peeling paint, chalky surfaces and visible cracks across the exposed horizontal coping.
Areas where the coating had failed also required preparation to establish a sufficiently sound and even substrate before the new coating system could be applied.
Recorded Protimeter readings included:
- 26.8% WME on the coping
- 15.6% WME on the wall below
Our inspection identified cracks through the exposed coping as one route through which rainwater could enter the wall.
Painting only the vertical wall face would therefore have left the damaged horizontal top untreated.
Removing Failed Coatings
High-pressure washing removed substantial loose coating from the affected surfaces.
Remaining unstable paint was scraped and abraded, hard coating edges were feathered and loose dust was removed before further preparation.
This step is important because a premium finishing coat applied over unstable existing paint remains dependent on the adhesion of that weak layer underneath.
Bonding Preparation
Chalking was identified on the coping.
The prepared area therefore received Dulux Bonding Liquid where specified before the waterproofing system was applied.
Bonding preparation is not automatically required on every wall. Its purpose is to stabilise suitable prepared surfaces where the existing substrate remains friable or powdery.
Crack Repairs and Coping Waterproofing
The documented repair scope included suitable plaster cracks approximately 1–5 mm wide.
Relevant cracks were opened into a V-shaped joint and cleaned before compatible masonry patching material was used where suitable.
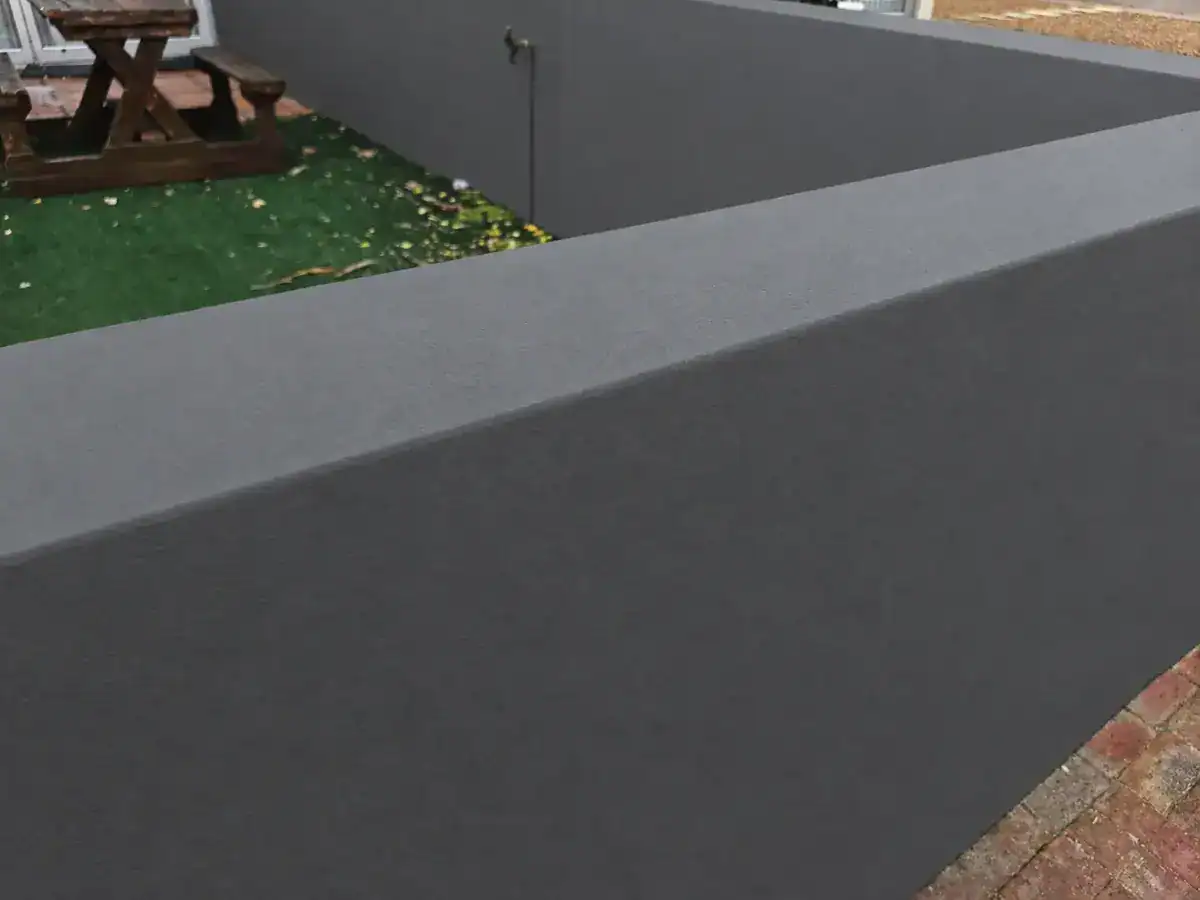
Once the repaired areas were prepared, the exposed coping received two coats of Dulux Rainshield, with the second coat applied perpendicular to the first.
The waterproof coating extended beyond the top surface onto the sides of the coping so the horizontal detail was treated as a complete exposed edge rather than only a narrow top strip.
For a broader explanation of this preparation system, see Waterproofing Durbanville.
Vertical Wall Preparation
The vertical wall areas required their own preparation and finishing system after the coping defects had been addressed.
Suitable areas showing damp-related symptoms received the specified specialist preparation before the decorative exterior finishing coats were applied.
This distinction is important because the horizontal coping and vertical wall face perform different functions and should not automatically receive identical treatment.
The Boundary-Wall Moisture Limitation
The owner was also advised that waterproofing the coping could only address water entering from the exposed top.
The wall did not have an effective damp-proof separation preventing moisture from migrating into the masonry from below or behind.
Painting the visible face and waterproofing the coping therefore could not create a missing damp-proof barrier inside the structure.
Moisture-related bubbling, peeling or discolouration caused by continuing moisture from below or behind remained outside the coating warranty.
This is why boundary walls require especially realistic expectations.
Our dedicated Boundary Wall Painting Durbanville guide explains coping waterproofing, irrigation, backfill, soil contact and warranty limitations in greater detail.
What the Durbanville Hills Example Shows
A boundary wall can have more than one moisture route at the same time.
Cracked coping may be repairable from above, while moisture entering through soil, irrigation, ground contact or the rear face remains a separate condition.
A useful quotation should explain both the defects being repaired and the moisture conditions the decorative coating cannot permanently control.
Our D’Landen Estate exterior painting case study provides another local example involving cracks, horizontal waterproofing and clearly documented moisture limitations.
Aurora: Interior Paint Failure Linked to Defective Canopy Flashing
Location: Aurora, Durbanville
Completed: 10 September 2026
Project: Interior painting with repairs to an exterior canopy-to-wall junction
What We Found in the Bedroom
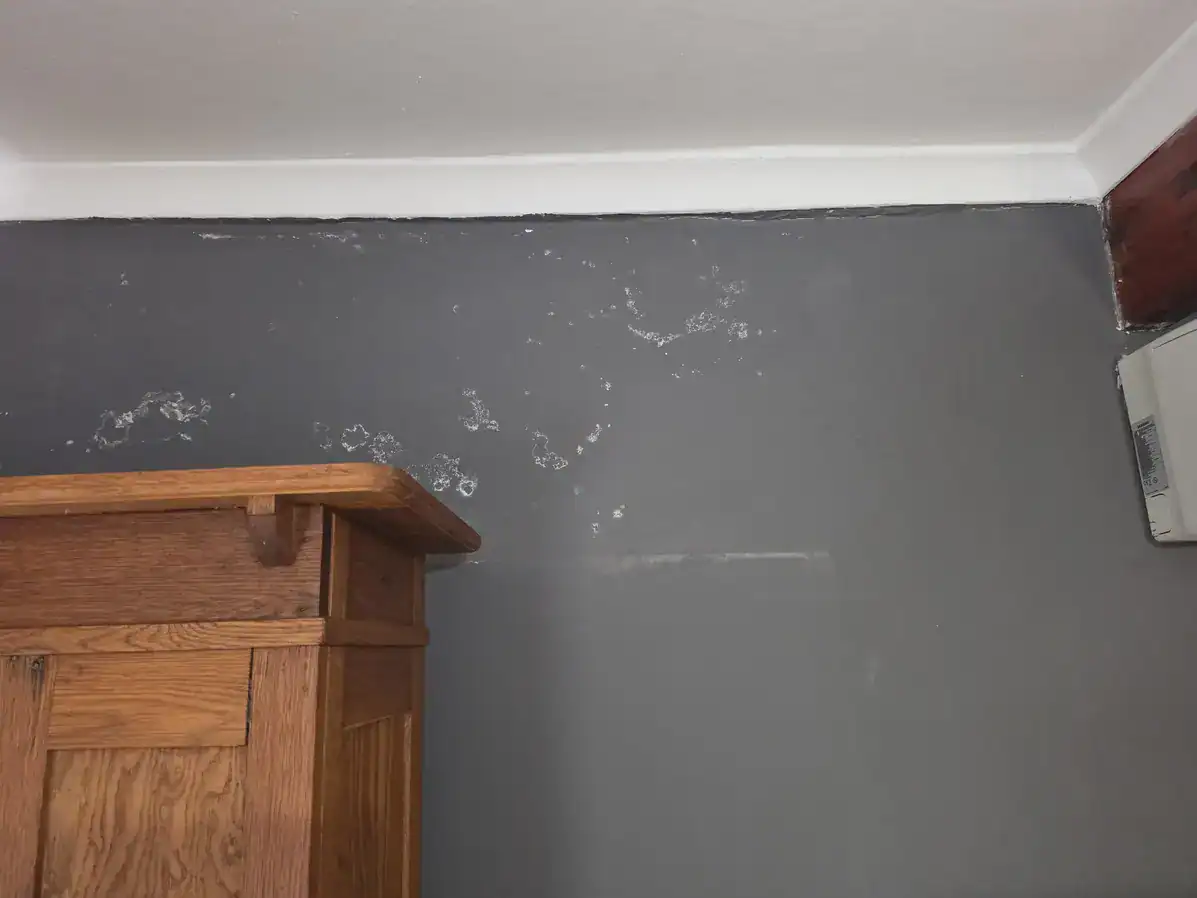
Peeling and chalky coatings were visible on the inside face of an exterior bedroom wall.
Protimeter readings across the assessed areas ranged from 10.5% to 22.7% WME.
Again, those readings formed only one part of the investigation. The position of the coating failure and the exterior construction needed to be inspected before the water-entry route could be identified.
Tracing the Defect to the Exterior Canopy
Outside the bedroom, a corrugated roof-sheet canopy joined the exterior wall.
Our inspection identified failed flashing at this canopy-to-wall junction as the water-entry defect associated with the interior damage.
This changed the repair sequence completely.
Removing the failed interior coating and applying another decorative finish would have left the defective exterior junction in place.
Replacing and Sealing the Flashing
The defective aluminium flashing was removed and replaced.
The replacement flashing was mechanically secured to the wall, and suitable single-pack polyurethane sealant was used at the relevant fixing points and junctions.
The upper connection between the flashing and the wall was also sealed before the interior restoration continued.
This exterior repair addressed the identified water-entry route before the damaged bedroom wall was redecorated.
Preparing the Interior Wall
Peeling interior paint was removed and the affected wall was prepared.
The project specification included two coats of Dulux Dampshield on the relevant prepared areas, with the required drying period between applications.
Remaining imperfections were filled, sanded smooth and cleared of dust before the repaired sections were spot-treated where required.
The prepared wall then received the specified decorative finishing system.
The Completed Finish
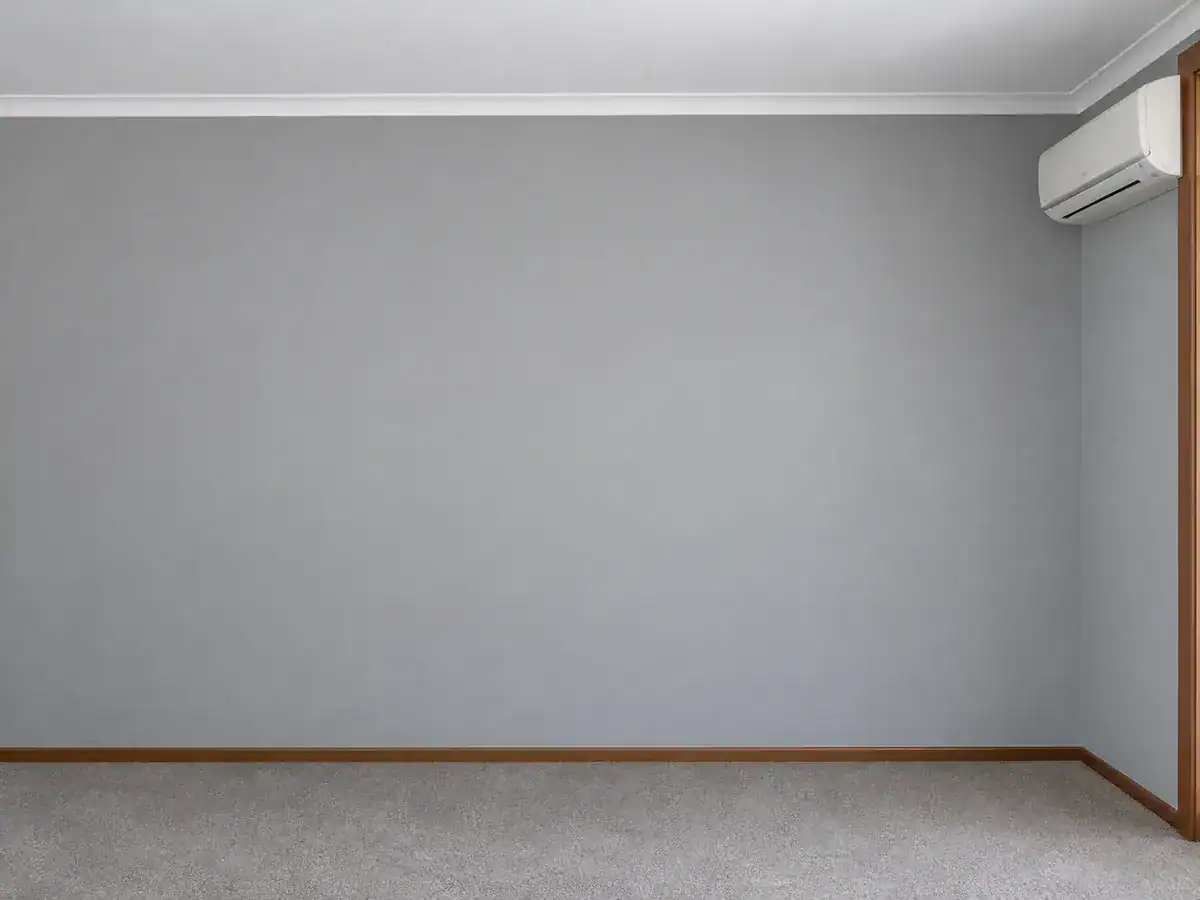
The final wall was painted in Dulux Luxurious Silk in Grey Steel 3, selected by the client.
The completion photograph records the finished appearance after the exterior flashing repair, removal of the failed interior coatings, surface repairs and repainting.
What the Aurora Example Shows
Interior paint failure can originate at an exterior roof-to-wall junction.
Where bubbling, staining or peeling occurs near a canopy, roofline or flashing detail, that exterior connection deserves inspection together with the damaged wall.
For suitable interior repainting after the cause and preparation requirements have been established, see our Interior Painters Cape Town service.
What Should Be Checked Before Repainting Peeling Walls?
These three Durbanville properties all showed deteriorating paint, but the inspections revealed three different underlying defects.
- Vygeboom: failed exterior window sealing needed attention before the damaged interior sill was restored.
- Durbanville Hills: cracked coping required repairs and waterproofing, while continuing moisture from below or behind remained a separate limitation.
- Aurora: failed flashing at an exterior canopy junction had to be repaired before the bedroom wall was repainted.
The useful starting point is therefore an inspection of the affected surface together with the nearby building details.
The finishing paint should be selected only after establishing what repairs and preparation the surface requires.
Describe Where and When the Damage Appears
Before requesting an inspection, note where the failure occurs and whether there appears to be a pattern.
For example:
- Is the damage directly below a window?
- Does it occur beside a roof or canopy junction?
- Is it concentrated along a boundary-wall coping?
- Is the problem close to ground level?
- Does it worsen after periods of rain?
- Has the same area failed again after a previous repaint?
Photographs taken over time and information about earlier repairs can help establish the history of the problem.
Understand What Moisture Readings Can and Cannot Tell You
Moisture readings are useful diagnostic observations, but they should not be treated as a complete diagnosis.
The figures need to be considered together with:
- the substrate;
- the position of the damage;
- visible cracks;
- window and door seals;
- copings and parapets;
- roof junctions;
- ground levels; and
- other construction details.
A reading alone does not identify where water entered or determine which primer or coating should be used.
Look for a Written Repair Sequence
A useful quotation should explain more than the brand and number of finishing coats.
Where coating failure is present, the written scope should identify:
- the visible coating failure;
- relevant inspection findings;
- building defects included for repair;
- any condition requiring further investigation;
- loose-paint and chalking preparation;
- crack repairs;
- sealing or waterproofing;
- specialist primers where required;
- finishing coats; and
- important exclusions or limitations.
This makes it easier to compare two quotations that may appear similar in price but contain very different levels of remedial preparation.
Do Not Copy One Project’s Product Specification to Another
The products and repair sequences described in these case studies record what was specified for those particular properties.
They are not intended as a universal repair recipe.
At Vygeboom, Dulux provided project-specific guidance for the damp-affected interior sill. At Durbanville Hills, the exposed coping required a different crack-repair and waterproofing system. At Aurora, repairing the exterior flashing was central to the work before the interior coating was restored.
The correct system depends on the substrate, existing coatings, moisture condition, defects and relevant supplier or manufacturer recommendations.
A Finished Photograph Does Not Tell the Whole Story
A completed photograph shows how the property looked at handover.
The more important technical evidence lies in what was found and repaired beneath the final finish.
For example, the completed Durbanville Hills boundary wall looks restored, but the continuing ground-moisture limitation still applies because painting and coping waterproofing cannot create an absent damp-proof barrier.
Arrange a Painting Inspection in Durbanville
If paint is peeling, bubbling, chalking or repeatedly failing at your Durbanville property, the first step is to assess the damaged coating together with the surrounding building details.
Our written quotation records the visible conditions relevant to the painting work, the included preparation and repairs, the specified coating system and important limitations.
Painters Cape Town brings 27 years of painting and surface-preparation experience, full-time employed painters and working-foreman supervision to its projects. We are a direct painting contractor rather than a lead-generation company.
Visit our Painters Durbanville page for our complete local service, or request an inspection and written quotation.
Call 082 374 6862
Helpful Durbanville Painting Guides
Painters Durbanville
View our complete local painting service and documented projects.
Waterproofing Durbanville
See how cracks, windowsills, parapets and failed seals are treated before repainting.
Boundary Wall Painting Durbanville
Understand recurring boundary-wall failure caused by coping defects, irrigation and ground moisture.
Roof Painting Durbanville
See genuine roof preparation examples and why roof paint cannot repair active leaks.
Body Corporate & Complex Painting
See how repeated defects were handled across 14 completed D’Landen townhouses.
House Painting Costs Durbanville
See how remedial preparation and coating defects affect genuine painting quotations.