
Three Durbanville Homes, Three Different Routes of Water Entry
Peeling or bubbling paint tells you that something needs attention, but the damaged coating alone does not explain the cause. The useful questions are where the moisture is coming from, which surfaces have failed and what needs correcting before repainting.
This guide follows three painting projects we completed in Vygeboom, Durbanville Hills and Aurora during 2026. Each includes our own before-and-after photographs, recorded Protimeter readings, inspection findings and the preparation carried out.
- Vygeboom: a damaged interior windowsill where our inspection identified water entry through failed exterior window sealing.
- Durbanville Hills: peeling boundary-wall coatings and cracked coping, with a separate limitation concerning moisture entering from below or behind.
- Aurora: peeling bedroom-wall paint where the investigation identified failed flashing at an exterior canopy-to-wall junction.
The examples explain why we assessed the building defects before choosing the repair and coating systems. They also show why the preparation specified for one property should not automatically be applied to another.
For an overview of our local painting services or to arrange an inspection, visit our Painters Durbanville page.
About the evidence: Causes described here come from our site inspections, rather than photographs alone. The completion photographs show the finished appearance at handover. Protimeter readings on masonry are reported as wood moisture equivalent (%WME), rather than the actual percentage of water in the wall.
Vygeboom: Peeling Interior Windowsill Paint Linked to Failed Exterior Sealing
Location: Vygeboom, Durbanville
Completed: 6 March 2026
Project: Interior painting with exterior window-seal repairs
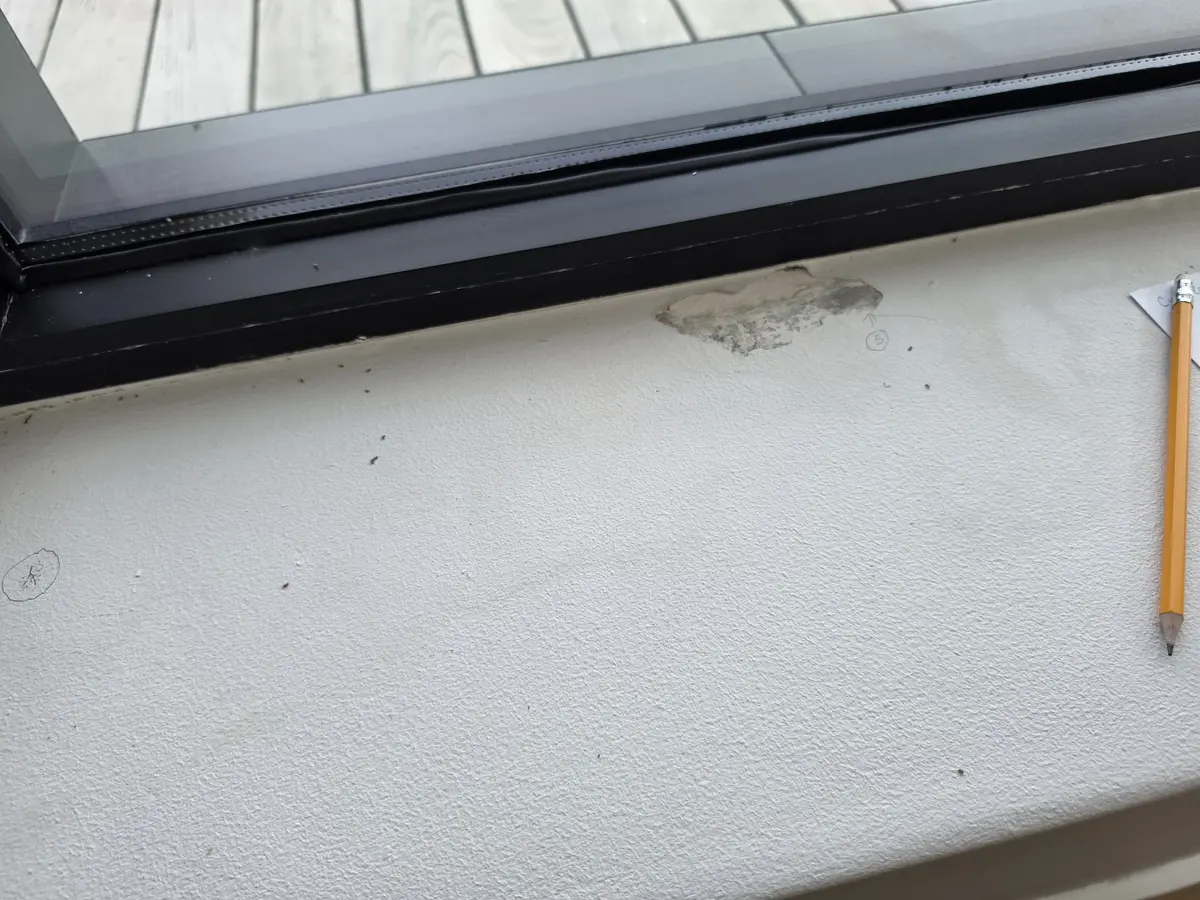
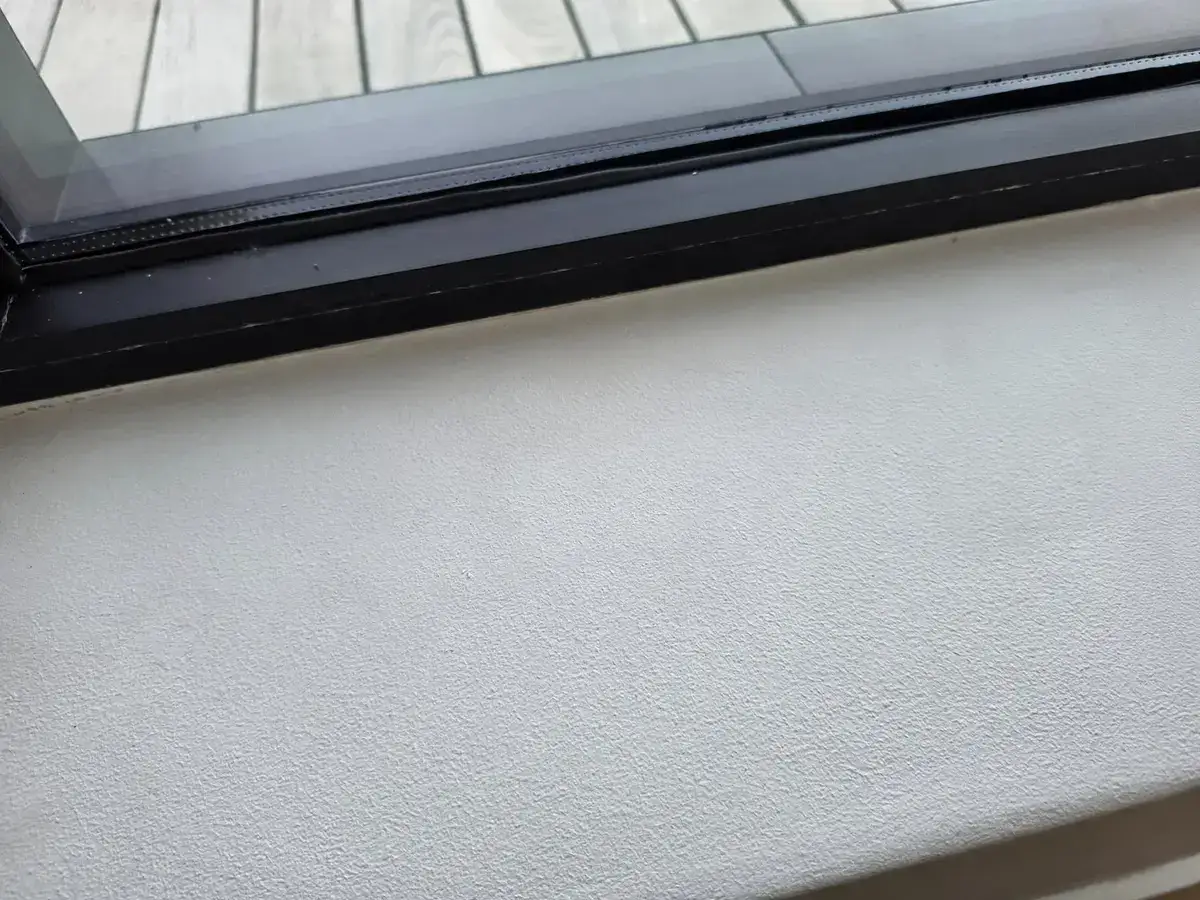
What We Found at the Interior Sill
During this interior painting project, we found peeling paint on the inside of a north-facing window. The failed coating had exposed the cementitious surface and left a visible depression that needed repairing before a consistent finish could be achieved.
We checked the affected sill and the wall beneath it using a Protimeter DigitalMini BLD5775N. The recorded readings were 19.7% WME on the sill and 12.1% WME on the wall below.
The higher reading at the sill helped us assess the distribution of moisture. The readings alone did not establish the entry route; the exterior inspection provided the additional evidence.
The Exterior Defect Behind the Interior Damage
Our inspection identified water ingress through failed sealing around the exterior window frame. The existing silicone sealant had weathered and required replacement.
Repairing the visible interior patch alone would have left that identified water-entry route untreated. We therefore addressed the exterior window junction before completing the interior restoration.
Exterior Resealing and Finishing
The deteriorated exterior sealant was removed and replaced with a single-pack polyurethane sealant. On this project, the new sealant received one coat of Dulux Universal Undercoat to help prevent discolouration showing through the finishing coats.
The prepared exterior reveal, including the sealed junction, then received two coats of Dulux Wallclad, tinted to match the surrounding exterior colour.
Repairing and Repainting the Interior Surface
Loose interior paint was removed, and the depression was repaired using masonry patching plaster mixed with Permobond. Once dry, the repair was sanded to a smooth finish.
Dulux recommended Dampshield for the horizontal interior sill and the wall below in this particular project. Their advice took account of the existing moisture and the concern that using Rainshield in this location could restrict its escape and redirect it elsewhere.
This was advice for the assessed conditions at this property, rather than a general specification for every windowsill. Two coats of Dulux Dampshield were applied 24 hours apart, followed by two coats of Dulux Luxurious Silk in the client's existing interior colour.
What This Example Shows
A small patch of peeling interior paint can require work on the outside of the building. At this Vygeboom home, the repair combined exterior resealing, restoration of the damaged sill and a coating system recommended for the conditions found. Homeowners seeing similar damage should have the window junction and surrounding surfaces assessed before assuming that filling and repainting the patch will be sufficient.
Our Graanendal Estate damp-repair case study provides another local example of interior coating damage investigated alongside exterior defects. For the wider assessment and preparation service, see damp-related preparation before painting.
Durbanville Hills: Peeling Boundary-Wall Paint and Cracked Coping
Location: Durbanville Hills
Completed: 7 August 2026
Project: Exterior painting, including boundary-wall repairs
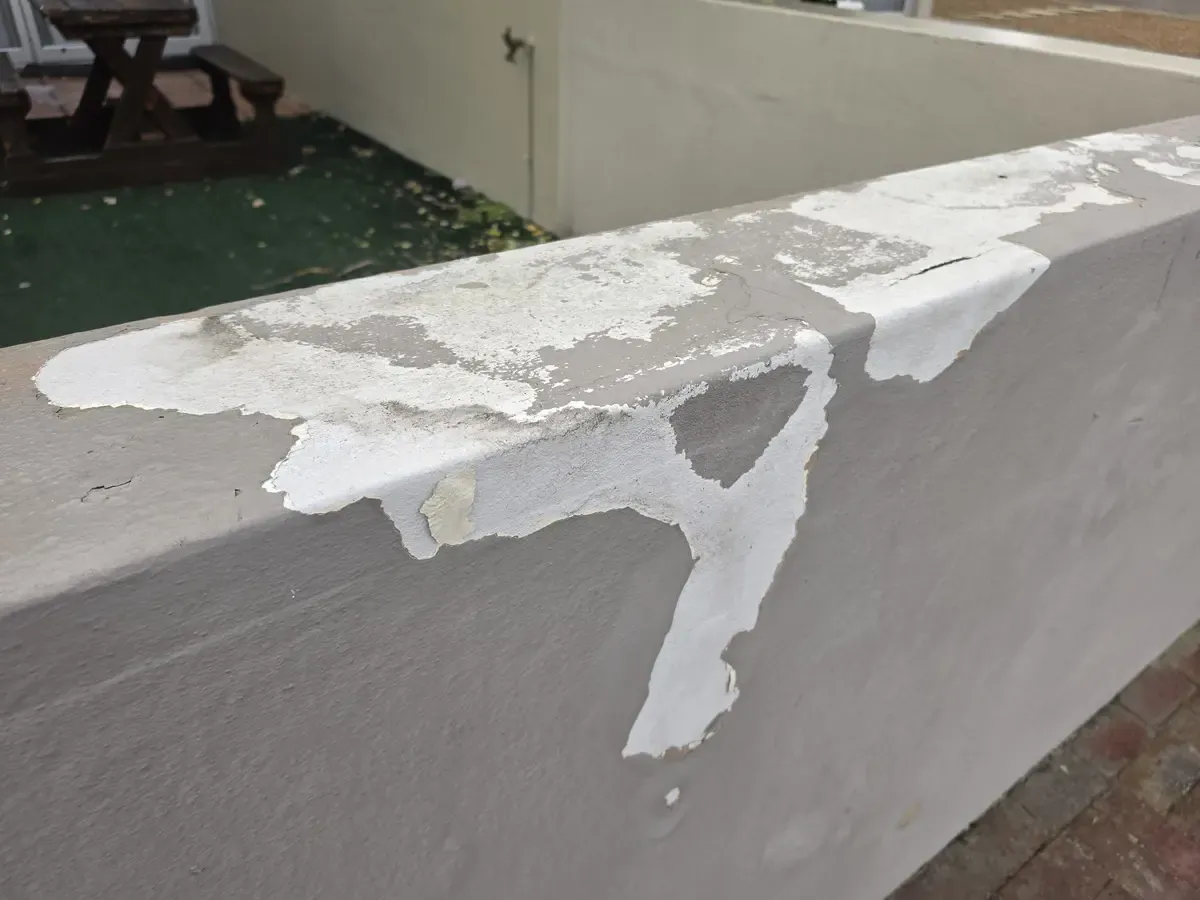
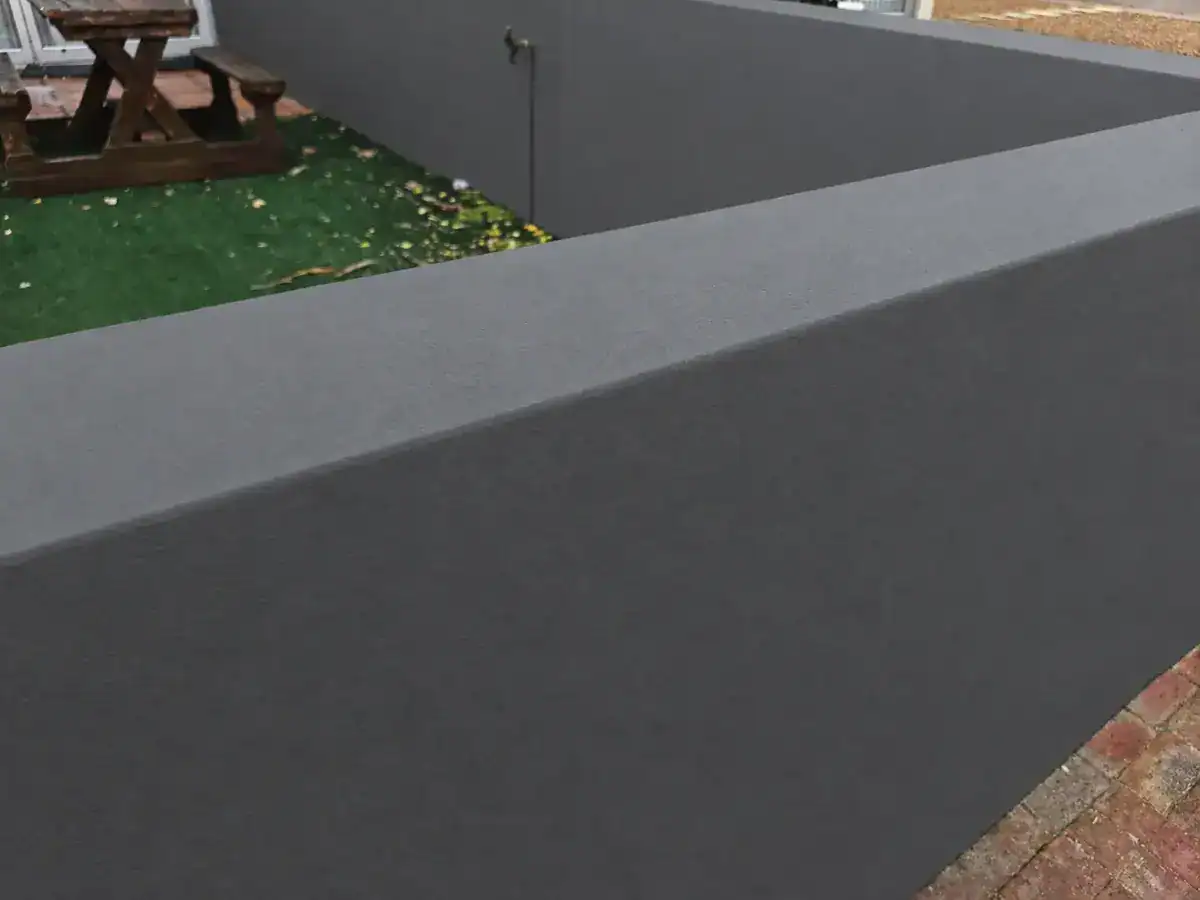
What We Found on the Wall and Coping
This boundary wall showed extensive peeling paint, chalky surfaces and cracks across its coping—the exposed horizontal top of the wall. Areas of failed coating had also left an uneven surface requiring preparation before repainting.
Recorded Protimeter readings were 26.8% WME on the coping and 15.6% WME on the wall below. Our inspection identified water entry through cracks in the coping.
The condition of the wall top was therefore central to the repair. Repainting the vertical face alone would have left the identified entry route above it untreated.
Removing Failed Paint and Preparing the Surface
High-pressure washing removed substantial amounts of loose coating. Remaining unstable paint was removed with scraping tools and 60-grit abrasive paper. Hard coating edges were sanded, and loose particles and dust were brushed away.
The purpose was to establish a sound surface for the repair and coating system. A new finish applied over loose paint would still depend on the adhesion of the failing material beneath it.
Because chalkiness had been identified on the coping, the prepared coping section received one coat of Dulux Bonding Liquid before the Rainshield application.
Crack Repairs and Coping Waterproofing
The recorded repair scope included plaster cracks approximately 1–5 mm wide. Relevant cracks were opened into a V-shaped joint and brushed clean. Repairs less than 10 mm deep were filled using the specified masonry patching plaster repair system, then sanded with P80 abrasive paper and cleared of dust.
After preparation and crack repairs, the coping received two coats of Dulux Rainshield. The coating extended approximately 30 mm down the sides, and the second coat was applied perpendicular to the first.
The specified crack-repair treatment also included two coats of Rainshield extending over the repaired areas, with the second coat applied perpendicular to the first. These details describe the work specified for this wall; the appropriate treatment for another wall depends on its construction, defects and coating requirements.
Vertical Wall Preparation and Finishing Coats
Following crack repairs, affected vertical areas showing damp-related symptoms received Dulux Dampshield.
The finishing system consisted of two coats of Dulux Weatherguard Smooth Textured, tinted to Monument Grey as selected by the client.
The completion photograph shows the restored coping and finished wall. The work addressed the identified coping defects, while the quotation separately explained the limitations associated with other possible moisture routes.
The Boundary-Wall Limitation Explained to the Owner
This wall had no effective damp-proof barrier separating the masonry from ground moisture. The owner was advised that moisture could therefore continue to migrate into the wall from below or behind.
Repairing and waterproofing the coping addressed water entry from above. It did not create a damp-proof barrier in the foundations or prevent an uncontrolled moisture source from reaching the rear of the wall.
Moisture-related discolouration, bubbling or peeling caused by continuing damp was excluded from the coating warranty. This was a limitation recorded for the assessed wall, rather than a claim that every boundary wall has the same construction or moisture problem.
What This Example Shows
A boundary wall can have more than one moisture route. Cracked coping may be repairable within the painting scope, while moisture entering from soil or the rear face can remain a separate limitation. A useful quotation should explain both the defects being repaired and the conditions that the coating system cannot control.
Our D’Landen Estate exterior painting case study documents further Durbanville examples involving cracks, horizontal waterproofing and moisture limitations. For the broader preparation and repainting service, see our exterior painting services.
Aurora: Interior Paint Failure Linked to Defective Canopy Flashing
Location: Aurora, Durbanville
Completed: 10 September 2026
Project: Interior painting with repairs to an exterior canopy-to-wall junction
What We Found in the Main Bedroom
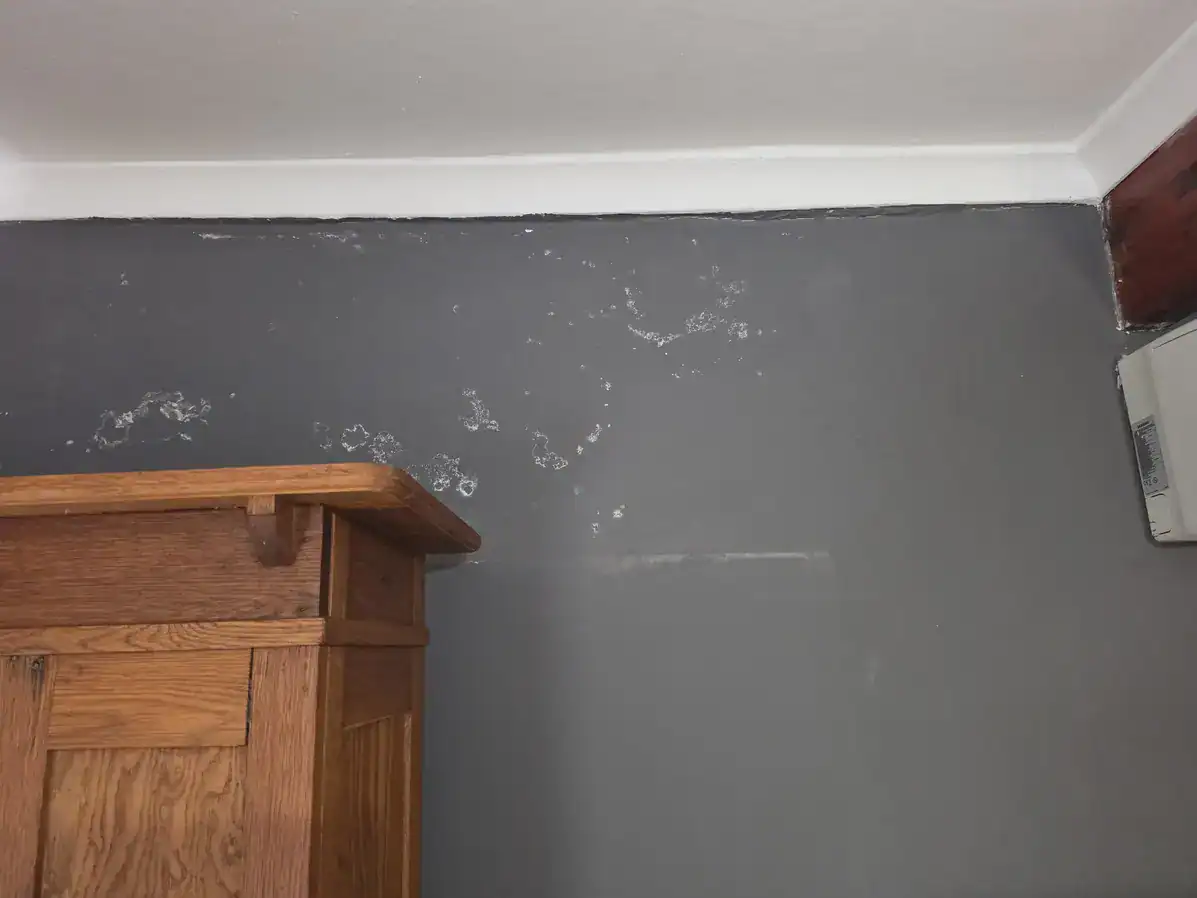
During this Aurora interior painting project, we assessed peeling and chalky coatings on the inside face of an exterior bedroom wall. The before photograph shows scattered areas of coating loss across the painted surface.
Recorded Protimeter readings on the assessed areas ranged from 10.5% to 22.7% WME. The variation formed part of the inspection evidence, alongside the distribution of the damaged paint and the condition of the exterior building details.
The photograph documents the visible damage. Identifying its cause required inspection beyond the interior wall surface.
Tracing the Water Entry to the Exterior Canopy
Outside, a corrugated roof-sheet canopy joined the wall. Our inspection identified failed flashing at this junction as the source of water ingress affecting the interior.
This finding changed the preparation required before decorating. Removing the peeling paint and applying a new interior finish would have left the defective exterior junction in place.
Replacing and Sealing the Flashing
The old aluminium flashing was removed and replaced. The replacement flashing was mechanically secured to the wall, with single-pack polyurethane sealant applied at the fixing holes and wall plugs before fastening.
The upper junction between the flashing and the wall was also sealed with polyurethane. These details describe the repair carried out at this property; flashing design and installation need to suit the particular roof-to-wall junction.
The exterior repair addressed the identified water-entry route before the interior coating system was completed.
Preparing the Damaged Interior Wall
Peeling interior paint was removed by sanding. The prepared wall then received two coats of Dulux Dampshield, applied 24 hours apart as recorded for this project and left to dry.
Remaining surface imperfections were filled with Polyfilla. Once dry, the filled areas were sanded smooth with 100-grit abrasive paper, and loose dust was removed using damp cloths.
The repaired areas were then spot-primed with Dampshield and allowed to dry before the finishing coats were applied.
The Completed Interior Finish
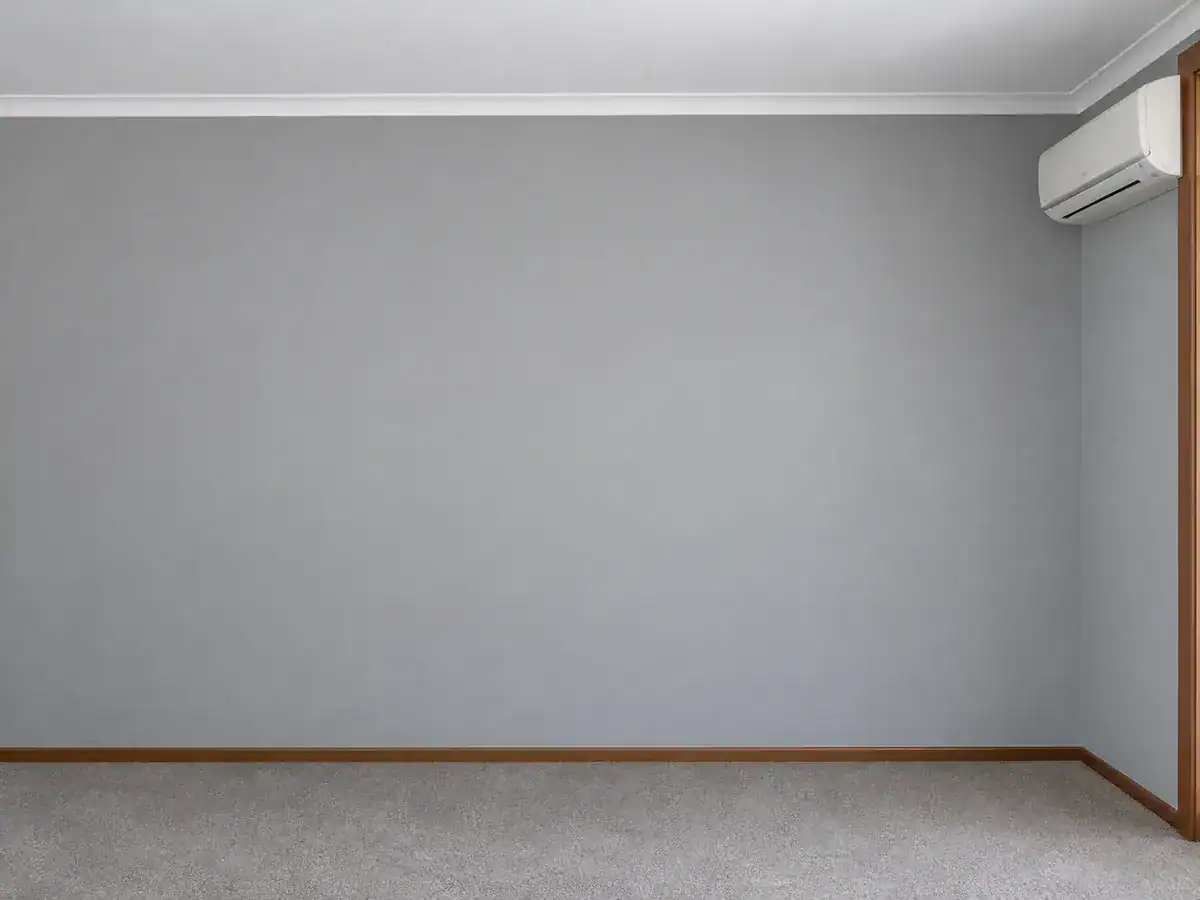
The prepared wall received two coats of Dulux Luxurious Silk in Grey Steel 3, selected by the client for the interior repaint.
The completion photograph shows the finished appearance at handover on 10 September 2026. The work combined repair of the exterior flashing junction with removal of failed interior coatings, surface repairs, priming and repainting.
What This Example Shows
Interior paint damage can originate at an exterior roof-to-wall connection. At this Aurora home, the inspection led to a flashing repair before the bedroom wall was restored. When coating failure appears near a canopy or roof junction, that connection deserves inspection alongside the damaged interior surface.
Our interior painting service covers preparation and repainting of suitable walls, ceilings and trim. To arrange an assessment of a local property, visit our Painters Durbanville page.
What Should Be Checked Before Repainting Peeling Walls?
These three Durbanville projects shared a visible symptom: deteriorating paint. However, our inspections identified different building defects, and each repair addressed the conditions found at that property.
- Vygeboom: failed exterior window sealing was addressed before the damaged interior sill was repaired and repainted.
- Durbanville Hills: cracked boundary-wall coping was repaired and waterproofed, while continuing moisture from below or behind remained a separate limitation.
- Aurora: defective canopy flashing was replaced and sealed before the interior bedroom finish was completed.
The useful starting point is therefore an inspection of the affected surface and the surrounding building details. Choosing a topcoat comes after establishing what preparation and repairs the surface requires.
Describe Where and When the Damage Appears
Before your inspection, note where the paint is failing and whether you have noticed a pattern. Does the affected area sit beneath a window, near a canopy, along the top of a boundary wall or close to ground level? Does the mark change after rain, or has it returned following an earlier repaint?
Photographs taken over time and any previous repair records can help explain that history. These observations give the contractor useful starting points; they do not establish the cause on their own.
Ask What the Moisture Readings Mean
Our project records include measurements from a Protimeter DigitalMini BLD5775N. On plaster and masonry, these are expressed as wood moisture equivalent (%WME), rather than the actual percentage of water contained in the wall.
The readings help document differences between inspected locations. They should be considered alongside the substrate, visible defects and surrounding construction. A reading alone does not identify the water-entry route or determine which coating should be applied.
The figures in this article are inspection records from the three properties. They are not universal pass-or-fail limits for repainting another home.
Look for a Written Repair Sequence
A useful quotation should explain more than the paint brand and number of finishing coats. For the affected areas, it should identify:
- The observed coating failure and relevant inspection findings.
- The identified defects to be repaired before repainting.
- Any suspected cause requiring further investigation.
- How loose coatings, chalkiness and surface imperfections will be prepared.
- The specified sealing, waterproofing, priming and finishing work.
- Any separate specialist work or unresolved conditions outside the scope.
- The limitations that apply to the completed coating system.
This makes it easier to compare quotations on the work included, particularly where one proposal allows for repairs that another leaves out.
Keep Product Specifications Specific to the Property
The product names and application sequences in these examples record what was used on those projects. They should not be copied as a universal repair recipe.
At Vygeboom, for example, Dulux provided advice for the damp-affected interior sill and the wall below it. At Durbanville Hills, the exposed coping required a different treatment, with its preparation and waterproofing specified separately from the vertical wall areas.
The appropriate system depends on the assessed surface, the repair requirements and the relevant supplier or manufacturer guidance.
Understand What the Finished Photograph Demonstrates
A completion photograph shows the appearance of the work at handover. The inspection notes and repair scope explain what was done beneath that finish and at the identified water-entry points.
At the Durbanville Hills boundary wall, documenting the continuing ground-moisture limitation was part of the work. A freshly painted surface did not remove that limitation, and the owner was advised accordingly.
Arrange a Painting Inspection in Durbanville
If paint is peeling, bubbling or repeatedly failing at your property, our assessment can help establish the visible conditions relevant to the proposed painting work. Our written quotation records the preparation, included repairs, specified finishes and important limitations.
Painters Cape Town brings 27 years of experience, full-time employed painters and working-foreman supervision to its projects. We are a direct painting contractor, not a lead-generation company.
Visit our Painters Durbanville page for our local services and further project examples, or request an inspection and written quotation. You can also call 082 374 6862.
Helpful Painting Guides and Durbanville Project Evidence
- Why paint peels, fades and cracks in Cape Town — a broader guide to weather exposure, coating deterioration and preparation.
- Graanendal Estate damp and paint repairs — an interior painting project involving investigation of exterior cracks, failed window sealing and vulnerable windowsills.
- D’Landen Estate exterior painting case study — documented moisture readings, crack repairs, sealing, horizontal waterproofing and boundary-wall limitations.
- Roof painting in Durbanville — roof assessment, preparation and local project examples, including the distinction between roof coating and repairing active leaks.
Peeling and Bubbling Paint in Durbanville: Frequently Asked Questions
Does peeling or bubbling paint always mean the wall is damp?
No. Peeling or bubbling describes a visible coating defect, rather than a complete diagnosis. Moisture, weak underlying coatings, contamination and adhesion problems can require different investigations. In the three projects documented here, our inspections identified water-entry defects that needed attention alongside the damaged paint.
Why can paint fail inside when the defect is outside?
Water entering through an exterior building defect can affect the interior wall surface. At Vygeboom, our inspection identified failed exterior window sealing associated with damage to an interior sill. At Aurora, defective flashing at a canopy-to-wall junction was identified during investigation of bedroom-wall coating failure.
What do the Protimeter readings in these examples mean?
The DigitalMini readings on plaster and masonry are reported as wood moisture equivalent (%WME). They help document the moisture conditions at the inspected points, but they are not the actual percentage of water in the wall. They must be interpreted alongside the surface condition and inspection findings; a reading alone does not establish the source of moisture.
Can the damaged area simply be scraped, filled and repainted?
Surface repairs may be part of the work, but the cause must also be assessed. In our Vygeboom and Aurora examples, exterior sealing or flashing repairs formed part of the response. Repairing only the visible interior damage would have left the identified exterior defect untreated.
Why was the boundary-wall coping waterproofed?
Our Durbanville Hills inspection identified water entry through cracks in the coping. The recorded work included surface preparation, crack repairs, Bonding Liquid and two coats of Rainshield on the coping, extending approximately 30 mm down its sides. This addressed the identified entry route from above.
Does waterproofing the coping solve every boundary-wall damp problem?
No. At the Durbanville Hills property, the wall also lacked an effective damp-proof barrier separating the masonry from ground moisture. The owner was advised that moisture could continue entering from below or behind. Moisture-related coating failure caused by that continuing damp remained excluded from the coating warranty.
Can I use the same products and repair sequence at my home?
These examples document the work carried out at three particular properties. They are not universal application instructions. The appropriate preparation and coating system must suit the substrate, existing coatings, moisture conditions and relevant manufacturer guidance. The interior sill treatment at Vygeboom followed project-specific advice from Dulux.
How long should a repaired wall be left before repainting?
There is no single waiting period that applies to every repair. The surface must meet the requirements of the specified repair materials, primers and finishing system. The 24-hour intervals recorded between Dampshield coats in our interior examples describe those projects; they are not a universal drying period for damp walls.
What should I send when asking for an inspection?
Send a close-up photograph of the damage and a wider photograph showing its position near windows, roof junctions or ground level. Include the Durbanville area, when you first noticed the problem, whether it changes after rain and any previous repairs you know about. Photographs help explain the problem, but a site inspection may still be needed to establish the relevant defects and scope.
Who carries out your Durbanville painting work?
Our painting work is carried out by full-time employed painters with working-foreman supervision. Painters Cape Town is a direct painting contractor, not a lead-generation company. Our written quotations describe the observed conditions, included preparation and repairs, specified finishes and relevant limitations.
Arrange a Durbanville painting inspection or call 082 374 6862.