Zevenwacht Village Estate • Kuils River
Interior Painting at Zevenwacht Village Estate, Kuils River
A documented July 2026 full interior repaint involving 8.5%–16.7% Protimeter readings, wall cracks, movement-related cornice gaps, localised coating deterioration, a stained bathroom ceiling, painted joinery and a timber dining-area ceiling.
The project demonstrates why occupied-home interior painting requires different preparation systems for plastered walls, Rhinoboard ceilings, timber, cornices and high-contact doors, frames and skirting.
Zevenwacht Village Estate Project Highlights
- Private single-storey estate home in Kuils River.
- Project period: 8–15 July 2026.
- Complete interior repaint.
- Protimeter readings from 8.5% to 16.7%.
- Rhinoboard ceilings and cornices.
- Dining-area timber ceiling.
- Hairline and approximately 1 mm wall cracks.
- Movement-related gaps between cornices and walls.
- Peeling and discoloured paint on selected walls.
- Stained bathroom ceiling.
- Chip marks on doors, frames and skirting.
- Damp-related preparation on identified wall areas.
- Working-foreman supervision.
Real Zevenwacht Village Estate Interior Painting Evidence
This project records the actual condition of an occupied estate home before repainting — including measurable moisture, movement-related joints, plaster cracking, ceiling staining, coating deterioration and worn painted woodwork.
8.5%–16.7% Readings
Protimeter readings across inspected interior areas ranged from 8.5% to 16.7%, providing measurable evidence to consider alongside the visible wall defects.
Responsible Diagnosis
The quotation noted possible rising damp on two bedroom walls, but we do not claim that every bubbling or discoloured area had the same confirmed moisture source.
Occupied-Home Protection
Floors, furniture, fittings and adjoining finishes were protected while scraping, sanding, repairs and repainting were completed.
Movement-Aware Repairs
Cornice-to-wall gaps were prepared using flexible polyurethane where specified rather than relying only on brittle rigid filler.
Different Interior Substrates
Rhinoboard ceilings, plaster walls, timber ceiling, cornices and painted joinery each received substrate-specific preparation and finishing systems.
Stain-Blocking Preparation
Water-stained ceiling areas received specified undercoat preparation to reduce the risk of historic staining showing through the new ceiling finish.
Experienced Employed Team
The project quotation records the painters as Paint Academy trained and having at least ten years of experience with the company.
Direct Painting Contractor
Painters Cape Town uses its own employed team with working-foreman supervision rather than operating as a lead-generation enquiry website.
Interior Painting at Zevenwacht Village Estate in Kuils River
Painters Cape Town completed this documented Zevenwacht Village Estate interior painting project at a private single-storey home in Kuils River during July 2026.
The homeowner required a complete interior repaint rather than a small isolated repair.
The scope included Rhinoboard ceilings, cornices, plastered walls, doors, frames, skirting, a dining-area timber ceiling, a stained bathroom ceiling and identified damp-affected wall areas.
Protimeter readings recorded during the inspection ranged from 8.5% to 16.7%.
The property also displayed hairline and approximately 1 mm wall cracks, movement-related gaps between some cornices and walls, peeling and discoloured coating on selected walls, chipped painted joinery and a timber ceiling requiring attention.
This genuine estate project now supports our main Painters Kuils River hub together with our Interior Painters Cape Town, Residential Painters Cape Town and Damp Proofing Cape Town services.
Zevenwacht Village Estate Project Summary
- Location: Zevenwacht Village Estate, Kuils River, Cape Town.
- Property: Private single-storey estate home.
- Project period: 8–15 July 2026.
- Project type: Full interior repaint.
- Protimeter readings: 8.5% minimum to 16.7% maximum.
- Scope: Rhinoboard ceilings, dining-area timber ceiling, cornices, walls, doors, frames, skirting, stained bathroom ceiling and identified damp-affected walls.
- Supervision: Working foreman with regular additional site visits.
What the Interior Inspection Found
The inspection identified several different types of surface deterioration rather than one universal problem.
- Protimeter readings from 8.5% to 16.7%.
- Gaps between Rhinoboard cornices and adjoining walls associated with ceiling movement.
- Hairline and approximately 1 mm cracks on plastered walls.
- Peeling and discolouring paint on selected wall areas.
- The quotation noted possible rising damp on two bedroom walls.
- Chip marks on selected doors, frames and skirting.
- A timber dining-area ceiling requiring preparation.
- A stained bathroom ceiling included in the painting scope.
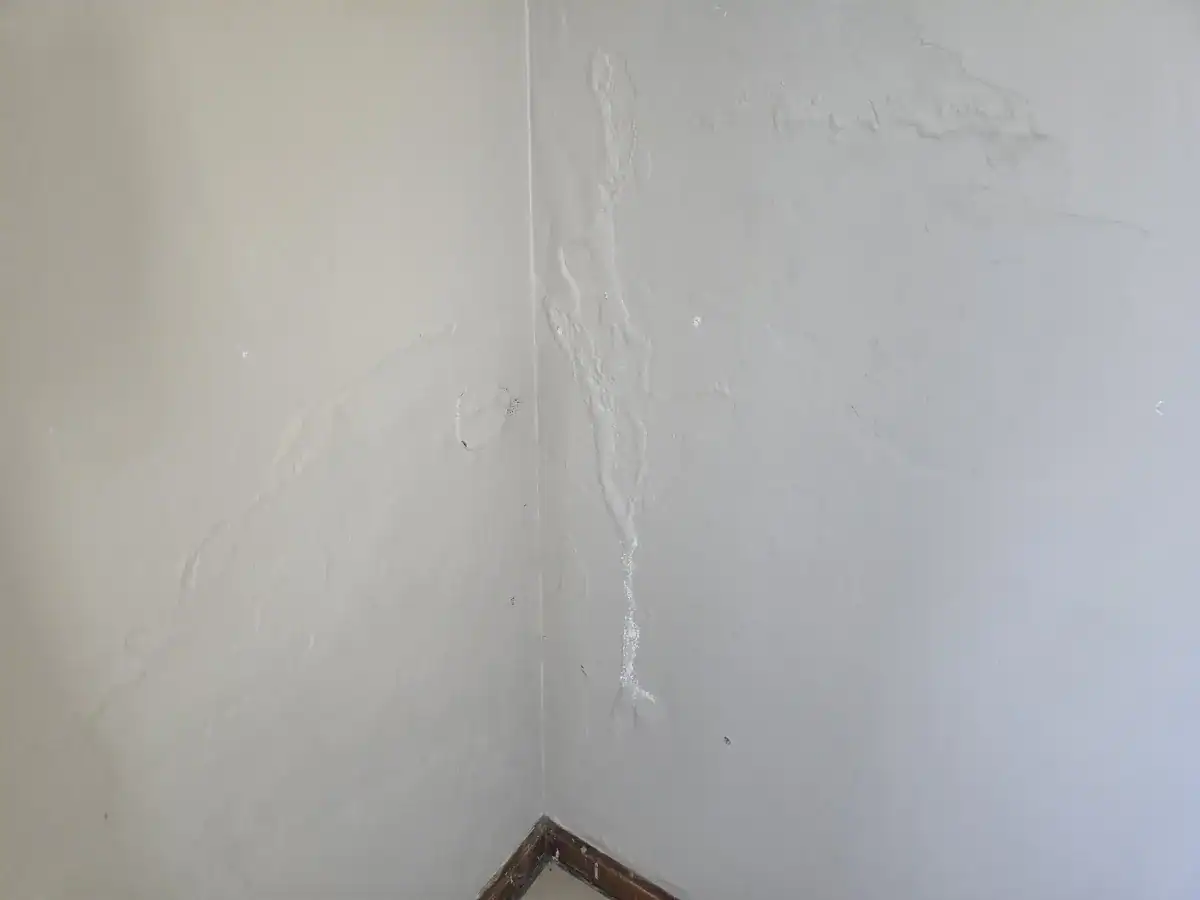
What the 8.5%–16.7% Moisture Readings Tell Us
The inspection recorded a range of moisture readings across the assessed interior surfaces.
Those readings are useful because they give measurable information about the substrate condition before repainting.
However, a Protimeter reading should not automatically be converted into a diagnosis such as rising damp, plumbing leakage or penetrating damp without considering where the reading was taken and what building conditions surround the affected area.
The original quotation described possible rising damp on two bedroom walls. The word “possible” is important.
It indicates that moisture-related preparation was warranted, but it does not establish that every visible bubble or discoloured area elsewhere in the house had exactly the same source.
Responsible Diagnosis of Bubbling Paint
The before photograph records localised bubbling and coating deterioration.
A photograph can establish that the existing paint system has failed. It cannot, by itself, determine whether the cause is moisture, weak adhesion, contamination, a previous coating defect or a combination of conditions.
For that reason, unstable material should first be removed so the underlying substrate can be physically assessed.
This is a more reliable approach than automatically labelling every interior paint bubble as “rising damp”.
Protecting an Occupied Estate Home
Interior repainting takes place alongside finished flooring, furniture, electrical fittings, joinery and other household contents.
The written project method therefore started with protection of flooring and furniture from paint splatter.
Light switches and electrical plug covers were removed where practical, while masking was used to create clean painting lines between ceilings and walls, around frames and above skirting.
Careful organisation is particularly important in connected living, dining and kitchen areas because the home still needs to be protected while scraping, sanding and painting are underway.
Wall Cracks Required Preparation Before Painting
The inspection recorded hairline and approximately 1 mm cracks in plastered walls.
The written preparation system included:
- alkali-resistant sealer applied into the crack;
- Dulux Rainshield brushed into hairline cracks using a stiff brush;
- a thin Polyfilla layer where required to create a smooth surface;
- light sanding after drying; and
- Dulux Wall Primer before the topcoats.
This preparation addresses the defect before applying the decorative wall system rather than simply hiding the line beneath new paint.
Cornice Movement and Flexible Junction Repairs
The Rhinoboard ceiling system showed gaps where some cornices met the adjoining walls.
The quotation associates these gaps with movement in the ceiling during windy conditions.
Movement-related junctions require a different approach from ordinary static plaster defects.
The written specification included single-pack polyurethane with approximately 25% flexibility at relevant cornice-to-wall gaps.
A flexible repair provides greater movement tolerance than brittle rigid filler, although no repair material can guarantee that future building movement will never become visible again.
Damp-Related Interior Preparation
The written specification included Dulux Pre-Paint Dampshield and Dulux Dampshield on relevant prepared interior wall areas.
Where substrate moisture readings registered between 15% and 50%, the specified system required additional spot treatment.
Bare affected surfaces received the documented Dampshield application and curing procedure before decorative finishing.
This preparation helps manage the coating interface on identified moisture-affected masonry. It does not repair an active plumbing defect, defective exterior waterproofing or another continuing source of water.
The Stained Bathroom Ceiling
A stained bathroom ceiling formed part of the interior repainting scope.
Historic water stains can bleed through ordinary ceiling paint even after the original incident has stopped.
The written specification therefore called for Universal Undercoat on water-stained areas before the ceiling finish was applied.
The Rhinoboard ceilings were then specified for two coats of Dulux Wall & Ceiling Paint.
The Dining-Area Timber Ceiling
The dining area contained a timber ceiling requiring separate treatment from the Rhinoboard ceiling surfaces.
The written specification called for light sanding with scourers to remove the existing sheen and create a key for the new coating.
The timber ceiling was then specified for two coats of Dulux Woodgard varnish.
This is an important example of substrate-specific preparation. Timber should not be treated as though it were plasterboard simply because both surfaces are located overhead.
Doors, Frames and Skirting
The inspection recorded chip marks on selected doors, frames and skirting.
High-contact painted woodwork experiences considerably more handling and abrasion than an ordinary plaster wall.
The documented preparation included:
- flexible polyurethane at cracks between walls and skirting where required;
- wood filler to repair chips;
- removal of loose and flaking paint;
- sanding and feathering hard coating edges;
- Dulux Wood Primer to bare timber;
- a full coat of Universal Undercoat to promote adhesion; and
- two coats of Dulux Pearlglo Water Based Enamel.
Using wall paint as a shortcut on doors, frames and skirting would not provide the same system.
Washable Low-Sheen Wall Finish
After the required preparation was completed, the plastered walls were specified for two coats of Dulux 100 Low Sheen.
The low-sheen finish was selected as a washable wall coating suitable for the practical cleaning requirements of an occupied family home.
Ceilings, timber, plastered walls and painted joinery were therefore all treated as separate substrates before their respective finishing systems were applied.
Interior Coating Systems Specified
- Rhinoboard ceilings: two coats Dulux Wall & Ceiling Paint.
- Water-stained ceiling areas: Universal Undercoat before finishing coats.
- Dining-area timber ceiling: light key sanding and two coats Dulux Woodgard varnish.
- Interior walls: two coats Dulux 100 Low Sheen.
- Damp-affected wall areas: Dulux Pre-Paint Dampshield and Dulux Dampshield where specified.
- Doors, frames and skirting: Wood Primer where bare, Universal Undercoat and two coats Dulux Pearlglo Water Based Enamel.
- Relevant movement junctions: flexible single-pack polyurethane sealant.
The named products are included because they appear in the genuine written project specification. Their inclusion does not imply manufacturer endorsement of Painters Cape Town or this webpage.
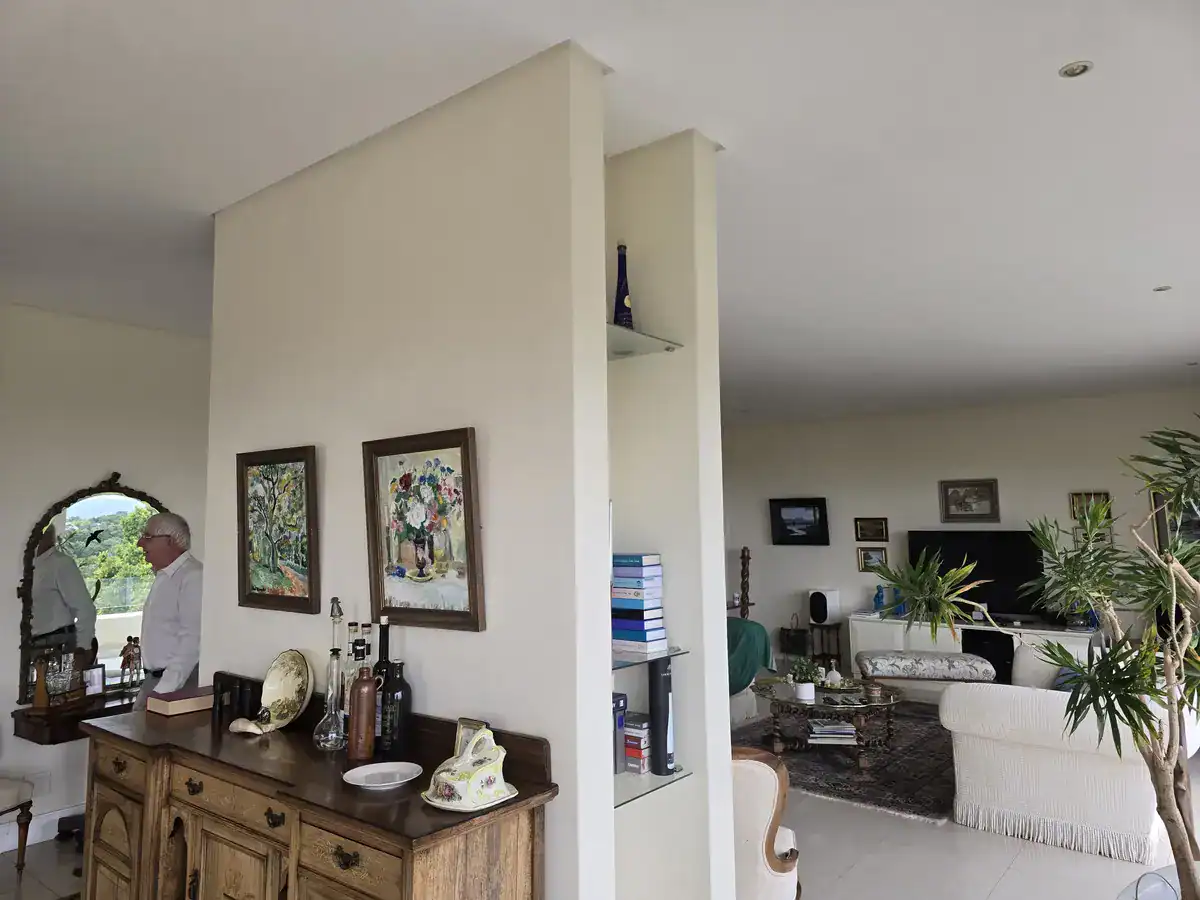
Completed Zevenwacht Village Estate Interior
The completed photograph shows the living and dining spaces after preparation and repainting.
The visible result is a consistent interior finish across walls, ceilings and painted trim.
Behind that finished appearance were crack preparation, movement-joint work, stain-blocking preparation, damp-related treatment, timber preparation and a separate coating system for doors, frames and skirting.
What This Zevenwacht Project Demonstrates
- Interior repainting can involve several very different substrates within one home.
- Moisture readings provide useful evidence but should not be converted into unsupported diagnoses.
- Movement-related cornice gaps require different treatment from static plaster damage.
- Historic stains may require stain-blocking preparation.
- Timber ceilings require a different preparation system from Rhinoboard ceilings.
- Doors, frames and skirting require more durable joinery preparation than ordinary walls.
- Protection and organisation are important during occupied-home painting.
- Preparation should be based on what is actually found during inspection.
Two Genuine Kuils River Painting Projects
This Zevenwacht Village Estate case study complements our separate Amandelrug exterior painting project.
The two projects demonstrate very different types of Kuils River painting work.
Amandelrug involved an approximately 13-year-old exterior coating, 15%–21% masonry readings, map cracking, failed joints and seals, vulnerable parapets and windowsills, timber fascia deterioration and rusting steelwork.
Zevenwacht Village Estate involved a full interior repaint, 8.5%–16.7% readings, plaster cracking, cornice movement, ceiling staining, a timber ceiling and high-contact painted joinery.
Together they provide genuine local evidence supporting our Painters Kuils River page rather than relying only on generic suburb descriptions.
Zevenwacht and the Kuils River Painting Cluster
Zevenwacht is one of the most important residential and estate areas within the wider Kuils River market.
The area includes established estate homes, village-style residential properties, lifestyle communities and newer development close to the Winelands-facing edge of the Northern Suburbs.
Kuils River connects to our Painters Cape Town Northern Suburbs regional hub as well as our wider Cape Winelands Painters service area.
Related services include:
- Interior Painters Cape Town
- Residential Painters Cape Town
- Damp Proofing Cape Town
- Body Corporate and Estate Painting Cape Town
Experienced Employed Painting Team
Painters Cape Town has 27 years of painting and surface-preparation experience.
The project quotation records the painters working on our projects as Paint Academy trained and having at least ten years of experience with the company.
That employee experience should not be confused with the age of the business itself: it refers to the tenure and experience of the painting team.
Our painters are full-time employed rather than subcontracted, and projects are supervised by working foremen.
We are not a lead-generation company. Clients deal directly with the contractor responsible for the inspection, quotation, preparation scope, employed team and completed work.
Request an Interior Painting Quote in Zevenwacht
If your home in Zevenwacht Village Estate, Zevenwacht Country Estate or elsewhere in Kuils River requires interior repainting, crack repairs, ceiling preparation, timber maintenance, joinery painting or assessment of moisture-related coating failure, the surfaces should be inspected before the system is specified.
Call 082 374 6862 or visit the Painters Cape Town contact page to arrange an inspection and written quotation.
Helpful Kuils River Painting Guides
Damp Walls and Repainting
Learn why moisture readings, previous leaks, waterproofing defects and the location of damage should be considered before a deteriorated wall is repainted.
Why Paint Peels, Fades and Cracks
Understand why moisture, weak adhesion, movement, cracks and insufficient preparation can cause an interior or exterior coating to deteriorate.
Planning a Premium Home Repaint
See how floors, furniture, joinery and completed finishes should be protected while substantial preparation and painting takes place inside a home.
Zevenwacht Village Estate Interior Painting FAQs
When was the Zevenwacht Village Estate project completed?
The documented full interior repaint was carried out from 8 to 15 July 2026 at a private home in Zevenwacht Village Estate, Kuils River.
What areas of the home were included?
The scope included Rhinoboard ceilings, the dining-area timber ceiling, cornices, plastered walls, doors, frames, skirting, a stained bathroom ceiling and identified damp-affected walls.
What moisture readings were recorded?
Protimeter readings across the inspected interior areas ranged from 8.5% to 16.7%.
Was rising damp confirmed?
The original quotation recorded possible rising damp on two bedroom walls. We therefore do not describe every bubbling or discoloured area in the home as confirmed rising damp without additional evidence identifying its source.
What does the bubbling-paint photograph prove?
It proves that the existing coating had locally deteriorated. A photograph by itself cannot prove whether the precise cause was moisture, weak adhesion, contamination or another coating defect.
What other defects were found?
The inspection recorded hairline and approximately 1 mm wall cracks, movement-related gaps between cornices and walls, peeling or discoloured wall paint, chip marks on painted joinery and a timber ceiling requiring attention.
How were hairline cracks prepared?
The documented specification included alkali-resistant sealer, Dulux Rainshield brushed into the crack, a thin Polyfilla finishing layer, light sanding and Dulux Wall Primer before the topcoats.
How were cornice gaps treated?
Relevant gaps between cornices and walls were specified for flexible single-pack polyurethane sealant rather than relying only on rigid filler.
How were damp-affected wall areas prepared?
The specification included Dulux Pre-Paint Dampshield and Dulux Dampshield on relevant prepared interior masonry according to the condition and recorded moisture range.
How was the stained bathroom ceiling prepared?
Universal Undercoat was specified over water-stained areas before the ceiling finishing coats to reduce the risk of staining showing through.
What paint was specified for the Rhinoboard ceilings?
The Rhinoboard ceilings were specified for two coats of Dulux Wall & Ceiling Paint after preparation.
How was the timber ceiling prepared?
The timber dining-area ceiling was lightly sanded with scourers to reduce the sheen and create a key before two coats of Dulux Woodgard varnish were specified.
What finish was used on the walls?
The prepared plastered walls were specified for two coats of Dulux 100 Low Sheen.
How were doors, frames and skirting prepared?
Chips were filled, loose coating removed, surfaces sanded and feathered, bare timber primed, a full Universal Undercoat applied and the finish specified as two coats of Dulux Pearlglo Water Based Enamel.
Was the home occupied during the painting work?
The project specification included protection of floors and furniture and careful masking around fittings and joinery, consistent with preparation for an occupied residential repaint.
Do you use subcontracted painting teams?
No. Painters Cape Town uses full-time employed painters with working-foreman supervision.
How experienced are the painters?
The project quotation records the painters as Paint Academy trained and having at least ten years of experience with the company.
How do I request an interior painting quote in Zevenwacht or Kuils River?
Call 082 374 6862 or visit the Painters Cape Town contact page to arrange a physical inspection and written quotation.

Copyright 2026 , all rights reserved.