Welgemoed • Bellville
Interior Painting at a Welgemoed Home, Bellville
A documented six-working-day interior repaint involving 8.2%–16.7% moisture readings, a vaulted ceiling, exposed timber trusses, movement-related joints, wall cracks, water staining and detailed joinery preparation.
Painters Cape Town completed the project from 16–23 March 2026 using six painters, with working-foreman supervision and different preparation and coating systems for plaster, timber, ceilings, joinery and damp-affected interior areas.
Welgemoed Project Highlights
- Private residential home in Welgemoed, Bellville.
- Completed 16–23 March 2026.
- 6 actual working days with 6 painters.
- Protimeter readings of 8.2%–16.7%.
- Vaulted kitchen and lounge ceiling.
- Painted timber ceiling and exposed trusses.
- Opened ceiling-board and truss junctions.
- Cornice-to-wall movement gaps.
- Hairline and approximately 1 mm wall cracks.
- Brown water stain on bathroom ceiling.
- Doors, frames, skirting and cupboards included.
- Interior damp-related preparation where specified.
Real Welgemoed Interior Project Evidence
8.2%–16.7% Moisture Readings
Protimeter readings recorded during the interior inspection ranged from 8.2% to 16.7%, helping identify areas requiring additional moisture-related preparation.
Vaulted Ceiling and Trusses
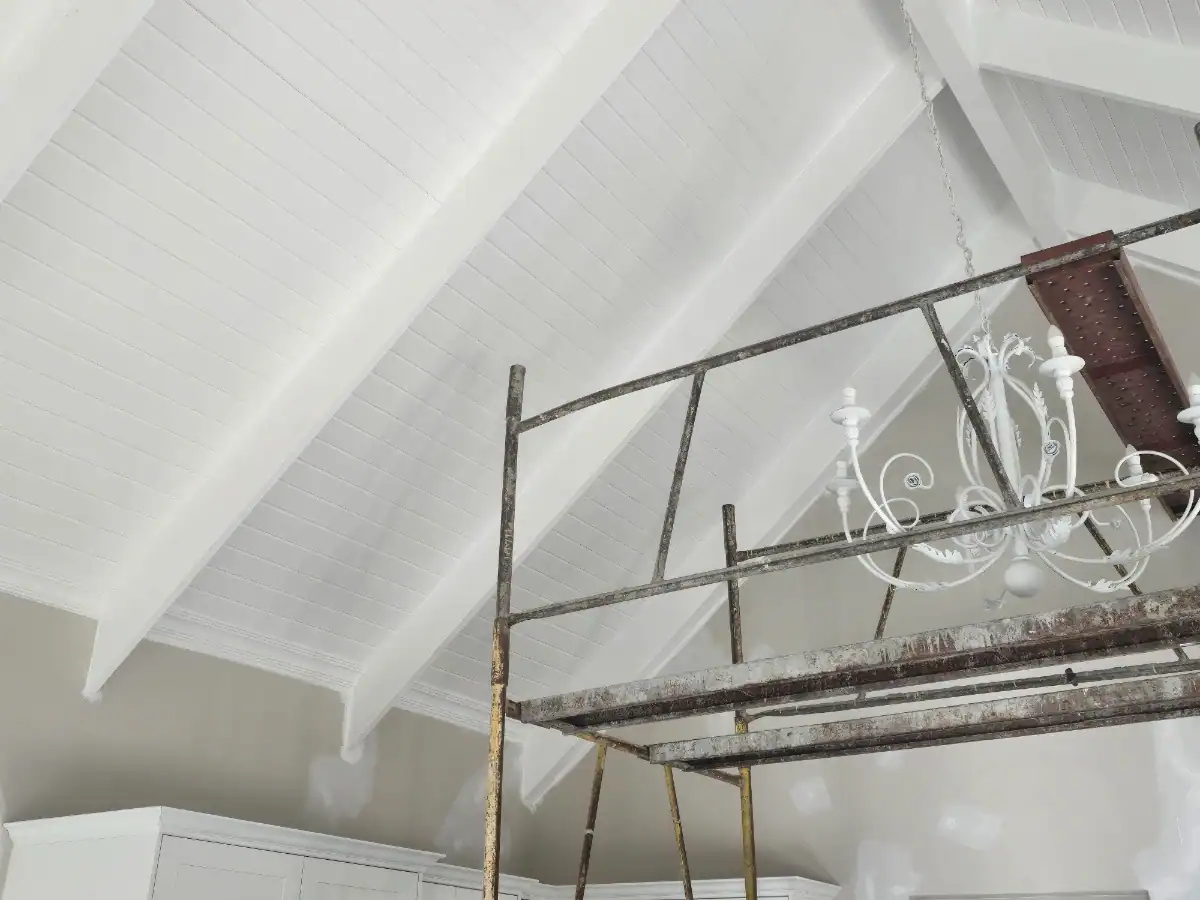
The kitchen and lounge contained a high vaulted ceiling with painted timber sections and exposed trusses requiring substrate-specific preparation and coating.
Movement-Related Joints
Opened ceiling-board joints, truss junctions and gaps between cornices and walls were recorded and required flexible preparation rather than rigid filling alone.
Cracks and Failed Paint
Hairline and approximately 1 mm wall cracks were identified together with peeling and discoloured paint on some interior wall areas.
Water Stain and Damp Preparation
A brown bathroom-ceiling water stain and damp-affected interior wall areas required separate preparation before the final decorative coatings were applied.
Direct Painting Contractor
Painters Cape Town uses full-time employed painters with working-foreman supervision rather than operating as a lead-generation enquiry website.
Interior Painting Project in Welgemoed, Bellville
This documented Welgemoed interior painting project involved the preparation and repainting of a private residential home in Bellville from 16 to 23 March 2026.
The work took six actual working days, with a weekend falling between the project dates, and was completed using a six-person painting team under working-foreman supervision.
The scope extended well beyond repainting the visible walls. It included Rhinoboard ceilings, a vaulted kitchen and lounge ceiling, cornices, plastered walls, doors, frames, skirting, kitchen cupboards and a built-in cupboard in one bedroom.
The physical inspection also identified several different preparation issues: moisture readings between 8.2% and 16.7%, opened timber joints, gaps at truss junctions, cornice movement, wall cracks, failing bathroom sealant, peeling and discoloured paint, chipped joinery and a brown water stain on a bathroom ceiling.
This real Welgemoed project supports our main Painters Bellville page and provides first-hand project evidence for our Interior Painters Cape Town and Residential Painters Cape Town services.
Welgemoed Interior Project Summary
- Location: Welgemoed, Bellville, Cape Town.
- Property type: Private residential home.
- Project dates: 16–23 March 2026.
- Actual working duration: 6 working days.
- Team: 6 painters with working-foreman supervision.
- Moisture readings: 8.2% minimum to 16.7% maximum.
- Scope: Ceilings, cornices, walls, doors, frames, skirting, kitchen cupboards and a built-in bedroom cupboard.
- Feature area: High vaulted kitchen and lounge ceiling with painted timber and exposed trusses.
What We Found During the Interior Inspection
The inspection was used to identify the defects that required preparation before repainting rather than treating the house as a simple colour-change project.
- Protimeter readings ranged from 8.2% to 16.7%.
- Small openings were visible between timber ceiling boards.
- Gaps were present where exposed trusses met surrounding surfaces.
- Movement had opened gaps between some Rhinoboard cornices and adjoining walls.
- Hairline and approximately 1 mm wall cracks were present.
- Sealant around some baths and basins was failing.
- Some interior wall coatings were peeling or discoloured.
- Doors, frames and skirting contained chip marks and surface damage.
- A brown water stain was visible on a bathroom ceiling.
Why the 8.2%–16.7% Moisture Readings Were Important
Moisture readings were taken as part of the inspection before repainting. The measured range extended from 8.2% to 16.7%.
These readings were considered together with the visible condition of the surfaces. Some wall areas showed peeling or discolouration, while a separate brown water stain was visible on the bathroom ceiling.
The written specification required additional damp-related preparation where the substrate entered the specified higher moisture range.
For this project, the damp-related treatment applied to the identified interior damp-affected walls. It was not treated as a substitute for correcting an active plumbing leak, roof leak or other continuing moisture source if one existed.
Our wider approach to moisture-related coating failure is explained on our Damp Proofing Cape Town page.
Protecting the Home Before Interior Preparation
Before preparation started, floors and furniture in the working areas were protected against paint splatter and preparation dust.
Light switches and electrical plug covers were removed where practical, and masking was used to maintain neat lines between ceilings and walls, around door and window frames and above skirting.
This type of protection is particularly important during a full interior repaint because preparation creates dust and debris before any decorative topcoat is applied.
Vaulted Kitchen and Lounge Ceiling
One of the strongest features of the Welgemoed project was the high vaulted ceiling across the kitchen and lounge area.
The ceiling included painted timber components and exposed trusses, while adjoining ceiling and wall surfaces required their own separate preparation.
The inspection recorded opened joints between ceiling boards and gaps where exposed trusses met surrounding surfaces.
These junctions were not treated as ordinary plaster cracks. The specification called for flexible single-pack polyurethane at the affected ceiling-board and rafter junctions.
Movement Between Cornices and Walls
The inspection also recorded gaps between some Rhinoboard cornices and walls. The quotation specifically associated this movement with movement in the ceiling during windy conditions.
The affected junctions therefore required a flexible repair rather than a brittle filler-only approach.
Single-pack polyurethane with approximately 25% flexibility was specified for the relevant gaps between cornices and walls.
Preparing Rhinoboard Ceilings
Rhinoboard ceilings were prepared separately from the painted timber ceiling and exposed trusses.
Water-stained ceiling areas received Universal Undercoat where specified to reduce the risk of the brown stain bleeding through the new finish.
After preparation, the Rhinoboard ceilings received two coats of Prominent Paints Wall & Ceiling Paint.
Preparing the Painted Timber Ceiling and Exposed Trusses
The painted timber ceiling and exposed trusses required a coating system suited to previously painted wood rather than the system used on plastered ceilings and walls.
Loose or defective coating was removed where required, surfaces were prepared to provide a suitable key and repaired areas were made sound before finishing.
The specified finishing system for the wooden ceilings and exposed trusses was two coats of Dulux Pearlglo Waterbase.
The use of separate coating systems for timber and Rhinoboard is important because the substrates behave differently and should not automatically receive the same preparation or finish.
Hairline and 1 mm Wall Crack Repairs
The inspection identified both hairline and approximately 1 mm cracks on interior walls.
The written preparation system for these cracks included:
- one coat of alkali-resistant sealer into the cracks;
- Dulux Rainshield brushed into the hairline cracks to fill and bridge them;
- a thin Polyfilla finishing layer;
- light sanding to achieve a smooth surface;
- Dulux Wall Primer before the decorative topcoats.
This is more detailed than simply filling the visible line with ordinary filler and painting over it.
Interior Wall Painting
After preparation and repair, the plastered interior walls received two coats of Dulux Luxurious Silk.
The wall finish was applied only after visible cracks, surface imperfections and identified damp-related areas had received the relevant preparation within the agreed scope.
Brown Water Stain on the Bathroom Ceiling
A brown water stain was recorded on one bathroom ceiling during the inspection.
The specification required Universal Undercoat on water-stained ceiling areas before the finishing coats were applied.
Stain-blocking preparation helps prevent old discolouration from showing through the new decorative coating. It does not, however, repair an active water source. If renewed moisture enters the ceiling after repainting, the source still needs to be identified and corrected.
Bath and Basin Sealant Repairs
Failing sealant was identified around some baths and basins.
The old defective sealant was removed where included and replaced with flexible single-pack polyurethane.
Wet-area joints require flexible detailing because small movements between different materials can cause rigid repairs to separate.
Doors, Frames and Skirting Preparation
Doors, frames and skirting were inspected independently from the walls because painted joinery is exposed to more handling and impact than ordinary plastered surfaces.
Chip marks were repaired using wood filler and sanded smooth. Loose and flaking coating was removed, hard edges were feathered using fine-grit sandpaper and the surfaces were dusted down before priming.
Bare timber areas received Dulux Wood Primer, followed by a full coat of Universal Undercoat to promote adhesion with the topcoats.
The finishing specification called for two coats of Dulux Pearlglo Water Based Enamel.
Kitchen Cupboards and Built-In Bedroom Cupboard
The interior scope also included the painted kitchen cupboards and a built-in cupboard in one bedroom.
These surfaces followed the joinery preparation system rather than being treated as wall surfaces. Chips and defects were filled and sanded, loose coating was removed, bare areas received wood primer, a full Universal Undercoat was applied and the finishing coats were completed with Dulux Pearlglo Water Based Enamel.
This helped create a consistent finish across doors, frames, skirting and the included painted cupboards.
Different Surfaces Required Different Paint Systems
The Welgemoed project is a useful example of why a full interior repaint should not rely on one universal paint product.
- Rhinoboard ceilings: two coats Prominent Paints Wall & Ceiling Paint.
- Wooden ceilings and exposed trusses: two coats Dulux Pearlglo Waterbase.
- Interior walls: two coats Dulux Luxurious Silk.
- Doors, frames, skirting and cupboards: Dulux Wood Primer where bare, full Universal Undercoat and two coats Dulux Pearlglo Water Based Enamel.
- Water-stained ceiling areas: Universal Undercoat before finishing.
- Interior damp-affected wall areas: Dulux Dampshield system where specified.
- Flexible junctions: single-pack polyurethane where specified.
The product names are included because they formed part of the documented project specification. Their inclusion does not imply manufacturer endorsement of Painters Cape Town or this webpage.
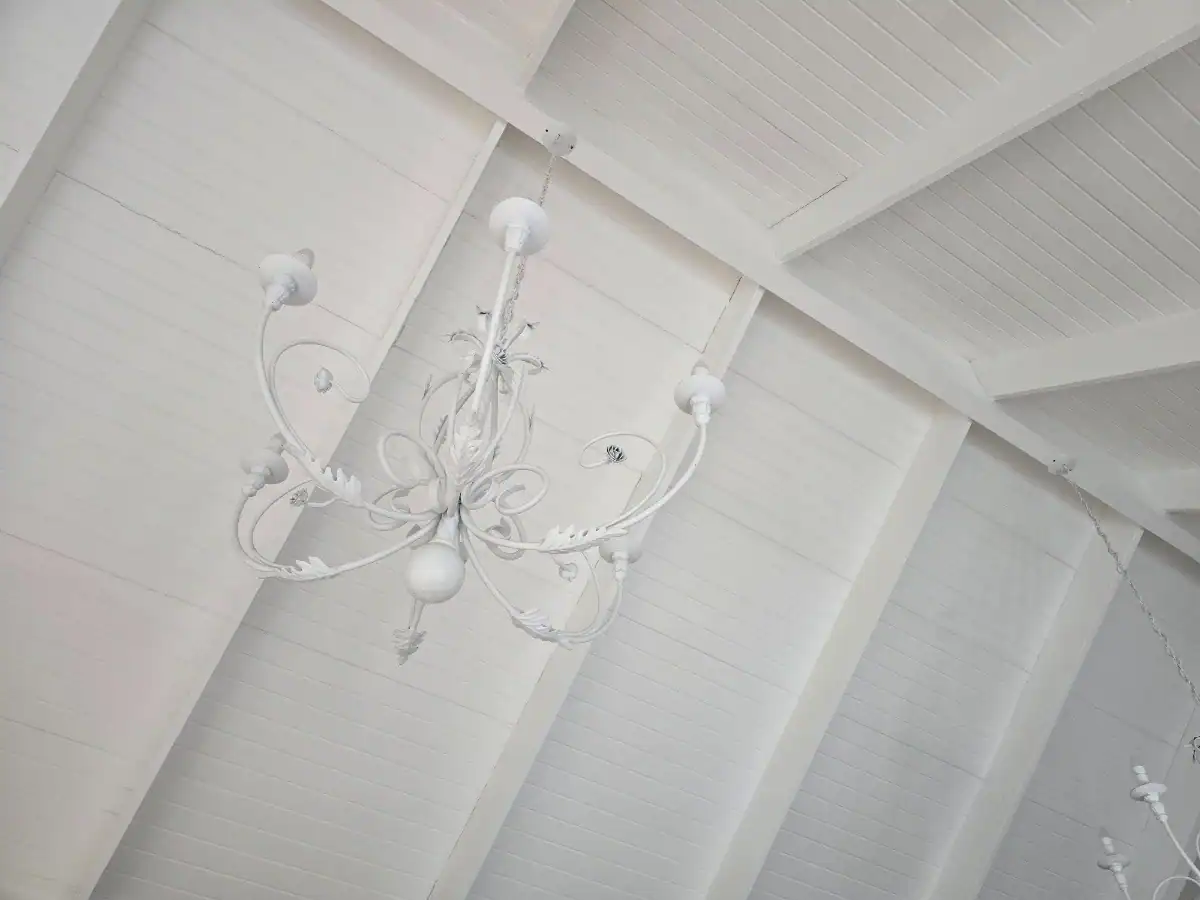
Completed Welgemoed Interior
The completed timber ceiling and exposed trusses show the result after preparation and repainting of one of the most technically demanding areas of the interior.
The broader six-working-day project also included the adjoining ceilings, cornices, walls and painted joinery throughout the agreed scope.
The important part of the project was not merely the colour change. Different substrates and defects were identified first, then prepared according to their condition before the final finishes were applied.
What This Welgemoed Project Demonstrates
This Welgemoed project demonstrates several elements of professional interior painting that are easy to overlook in a generic quotation:
- measuring moisture before repainting suspect walls;
- distinguishing timber movement from plaster cracking;
- using flexible materials at moving ceiling and cornice junctions;
- stain-blocking water-marked ceilings;
- preparing painted timber before recoating;
- using different coating systems for ceilings, timber, walls and joinery;
- protecting furniture and flooring during preparation;
- repairing wet-area sealant separately from decorative painting.
This is the preparation-first approach described in more detail on our Interior Painters Cape Town page.
Welgemoed and the Bellville Painting Cluster
Welgemoed is one of the important high-value residential areas within the wider Bellville painting market.
This interior project complements our separate Kanonberg Lifestyle Estate exterior painting project, giving the Bellville cluster genuine first-hand evidence across both interior and exterior residential painting.
For the broader area, visit our Painters Bellville page or the regional Painters Cape Town Northern Suburbs hub.
Related Cape Town-wide services include:
Preparation-First Interior Painting by a Real Contractor
Painters Cape Town has 27 years of painting and surface-preparation experience. Our painters are full-time employed rather than subcontracted, and projects are supervised by working foremen.
We are not a lead-generation company. Clients deal directly with the contractor responsible for the inspection, quotation, written preparation scope, employed team and completed work.
Correct interior preparation can greatly improve coating performance, but paint cannot prevent new structural movement, renewed water entry or another active moisture source from developing later.
Request an Interior Painting Quote in Welgemoed or Bellville
If your home has cracked walls, opened ceiling joints, stained ceilings, peeling paint, worn joinery or moisture-related coating problems, the preparation requirements should be assessed before repainting begins.
Call 082 374 6862 or visit the Painters Cape Town contact page to arrange a physical inspection and written quotation.
Helpful Painting Guides
These guides explain several issues relevant to the Welgemoed project, including cracking, moisture-related paint failure, surface preparation and planning a high-quality residential repaint.
Why Paint Peels, Fades and Cracks
Understand how moisture, cracking, weak adhesion and inadequate preparation can cause coatings to deteriorate prematurely.
Damp Walls and Repainting
Learn why moisture readings and the cause of damp-related deterioration should be considered before applying new decorative finishes.
Planning a Premium Home Repaint
See what homeowners should consider when planning preparation, protection, repairs, coating systems and final finishes.
Welgemoed Interior Painting FAQs
When was the Welgemoed interior painting project completed?
The project was carried out from 16 to 23 March 2026. There was a weekend during this period, giving an actual working duration of six working days.
How many painters worked on the project?
The documented project was completed using six painters with working-foreman supervision.
What areas of the home were painted?
The scope included Rhinoboard ceilings, the vaulted kitchen and lounge ceiling, cornices, walls, doors, frames, skirting, kitchen cupboards and a built-in cupboard in one bedroom.
What moisture readings were recorded?
Protimeter readings ranged from 8.2% to 16.7% on the inspected interior surfaces.
What defects were found before painting?
The inspection identified opened timber joints, truss junction gaps, movement-related cornice gaps, hairline and approximately 1 mm wall cracks, failed bathroom sealant, peeling and discoloured wall paint, chipped joinery and a brown water stain on a bathroom ceiling.
How were hairline wall cracks prepared?
The written specification included alkali-resistant sealer, Dulux Rainshield brushed into the cracks, a thin Polyfilla finishing layer, light sanding and Dulux Wall Primer before the topcoats.
How were the vaulted ceiling and exposed truss joints treated?
Gaps between ceiling boards and around the exposed rafters and trusses were treated with flexible single-pack polyurethane where specified rather than relying on rigid filler alone.
How was the brown bathroom ceiling stain prepared?
The specification called for Universal Undercoat on water-stained ceiling areas before applying the finishing coats to reduce the risk of the old stain bleeding through.
What paint was used on the timber ceiling and exposed trusses?
The documented specification called for two coats of Dulux Pearlglo Waterbase on the wooden ceilings and exposed trusses.
What was used on the walls?
The prepared interior walls received two coats of Dulux Luxurious Silk.
How were doors, frames, skirting and cupboards prepared?
Loose coatings were removed where required, chips were repaired, surfaces were sanded and feathered, bare timber received Dulux Wood Primer, a full Universal Undercoat was applied and the finishing system used two coats of Dulux Pearlglo Water Based Enamel.
Was the Dampshield treatment used on exterior walls?
No. On this project the damp-related preparation applied to identified interior damp-affected wall areas. The exterior-wall wording in the original quotation was a drafting error carried over from another specification.
Do you use subcontracted painting crews?
No. Painters Cape Town uses full-time employed painters with working-foreman supervision and direct contractor accountability.
How do I request an interior painting quote in Welgemoed?
Call 082 374 6862 or use the Painters Cape Town contact page to arrange a physical inspection and written quotation in Welgemoed, Bellville or the surrounding Northern Suburbs.

Copyright 2026 , all rights reserved.